
I'm excited to be part of By The Community, For The Community on the ASP.NET site. Go vote for the sample you'd like to see built, and an MVP will build it. If you have any suggestions for future samples, drop me a comment here.
Here is how some of my compadres are spending their time:
Sahil Malik set up shop on a new site: Winsmarts.Com. He's got his blog on and is going to run an ADO.NET boot camp this month.[1]
Bill Ryan has been writing a book for MS Learning and making covert trips to the mothership in Redmond. [2]
Wally McClure continues to smother the world with Wally. Wally in audio. Wally in print. [3]
Frans Bouma just shipped v2.0 of the O/R mapper and generator LLBLGen Pro.[4]
David Totzke is part of the team behind the launch of InfoQ.com - "Tracking change and innovation in the enterprise software development community". [5]
DonXML just shipped XPathMania. [6]
Sonu Kapoor continues to expand the ultra-aggregating DotNetSlackers.
Gavin Joyce launched DotNetKicks.
Great people, all of them.
[1] I've diagnosed Sahil with abdominochoreophobia - a fear of belly dancers.
[2] I'm not sure how many books Bill is currently coauthoring - I think it's around 50. Better him then me.
[3] Oh, and Wally made an Atlas video, too.
[4] I can't say anything about Frans; he'd argue with me and win.
[5] When I think of Dave, I think of Canada - home of the real Smarties (which don't seem to be available here in the U.S.).
[6] Don has read more Heinlein than anyone I know, which makes him cool.
This works everywhere except Application_Start. The code in that method can't connect to the database. What's the dilly?
A: The short answer is that impersonation isn't "on" during Application_Start, so SQL Server is seeing the worker process identity (NETWORK SERVICE or ASPNET) instead of Jacque's identity.
Application_Start is an odd event. It's not really a request related event, but of course it won't fire until the first event arrives. The ASP.NET runtime doesn't start impersonation until it begins to process the request in earnest. This event fires just before impersonation begins, during a time when ASP.NET is laying out the cocktail napkins and setting up for the party.
There are at least a couple workarounds for the problem. You could use a Singleton* design pattern, and initialize the Singleton during a request when impersonation is active (perhaps during the BeginRequest event). You could also run the worker process under an identity with rights in SQL Server.
* Note: The article points to a "Double-Check Locking Is Broken" paper. DBCL is a problem in NET 1.x without special pre-cautions, but is not an issue in the stronger memory model of 2.0 (see rule #5 in section "Strong Model 2" of this Vance Morrison article).
Step 1 gave us raw material to mold. Step 2 molded material into a readable diagram. The final step, step 3, is going to add some aesthetic touches. What? I thought this was a pragmatic process! Yes, that’s true. But we can always take 2 minutes to add finishing touches. We want to make the diagram easier to read, and we can use some additional formatting to draw attention to significant concepts in the drawing.
Here are three possible responses a developer might give when looking at our diagram:
A: Ahhhhh, I understand, now.
B: This is the most beautifully detailed diagram I’ve ever seen.
C: Who let their 3 year run amok with the plotter?
Our goal is to elicit response A.
The first thing I’ll do is generally add some thickness to the connector and shape lines. The spindly, thin lines that come by default are difficult to see and look weak. Choose varying line thickness to accent portions of the diagram. A line with a 9-point weight is a solid boundary - the kind of boundary you might want around a secure process. Right-click a shape and select Format –> Line to set the line properties. CTRL-click multiple shapes to set their properties all at once. This is also a good time to make the arrowheads on directional connectors stand out by adding thickness.
Finally, add a splash by filling your geometrical shapes with some color. Nothing too fancy, but white filled boxes on white paper don't stand out and can be hard to read. Right-click shapes, then select Format –> Fill. This is also a good time to add a title.
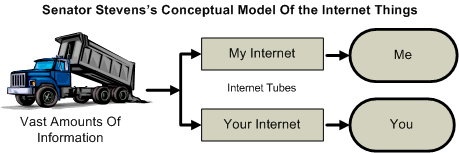
Voila! In less than 10 minutes we’ve created a diagram worth at least a few hundred words. We can hang it on walls, and include it in the architecture documentation. In this case, what we’ve built is actually more political commentary than software documentation, but the process worked just as well.
Step 1 produced the raw materials we need. Step 2 is molding the raw materials into a comprehensible diagram. There is a fine line between making a diagram comprehensible and adding little touches for the sake of aesthetics. As time ticks on, remember the ultimate objective is to communicate ideas to a team of software developers, not sell the diagram at an art exhibition. We need something more permanent than a whiteboard sketch, but that only requires a minimum amount of time.
My first action is adjusting the font sizes in the diagram. The default size is too small to read easily, so I select all the objects in the diagram and crank up the font size (CTRL+A, right-click the diagram, Format -> Text).
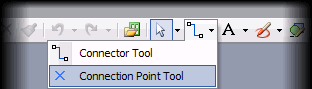
Next, I’ll add connecting lines and arrows. I’m a fan of the “Dynamic Connector” for straight lines between shapes, and “Wavy Connector 1” for a less formal directional line. Connectors should always glue to a connection point because moving shapes around will be easier (the connectors will move with the shape). Many shapes already have connection points at logical locations (the small blue x symbol), but you can add or move connection points, too. Click the Connection Point Tool on the standard tool bar, select a shape, then hold down the CTRL key while clicking the location to add a connection point.
Finally, I’ll start moving shapes around to achieve alignment and symmetry. Nothing too fancy at this point, just make sure the spacing is consistent and that nothing is so unbalanced as to attract attention. Some tools that can help at this point include:
The align shapes dialog (Shape –> Align Shapes) can quickly align shapes along their centers, tops, bottoms, left sides, or right sides. CTRL + click shapes to select multiple shapes for aligning.

I use the Snap and Glue toolbar to toggle the snap feature (the first button in the toolbar). Snapping is a quick and easy way to get shapes spaced perfectly. I turn off the snap feature when I have some text I need to sit in the diagram at a precise location.
I find it easier to use the arrow keys instead of the mouse to move shapes. I get a precise amount of movement from a keystroke. Select a shape and use the arrow keys to make coarse movements. Hold down a Shift key when using the arrow keys for fine-grained movements.
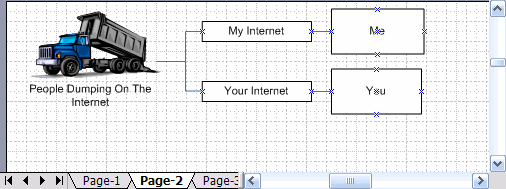
Finally, too much white space can make a diagram hard to comprehend. Step 2 can be an iterative process of moving, shaping, aligning, and compacting. The diagram should become smaller and more symmetrical. Here is our diagram after step 2.
Tune in tomorrow evening as we apply the final changes in step 3.
Over the years, I’ve had to whip up quite a few Visio diagrams. I used to spend a long time fiddling with different shapes and formatting, but not getting anything done. These days I have a three-step process that helps me crank out diagrams to communicate ideas. The diagrams won’t be the type you’ll include in product literature, nor will they win awards for innovation, but they are perfect to hang on the wall for a few weeks while a team is turning ideas into working software.
By the time I’ve reached Step 1, I have an idea of what I want to communicate in the drawing. For instance, I’ll know I want to show how account data comes into Service Foo (which is hosted in Process Bar) and runs through a series of pipes and filters.
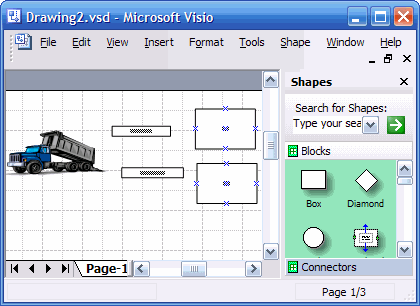
I’ll create a blank drawing and open only the “Blocks” and “Connectors” shapes. In the File -> Shapes menu, these shapes are under “Block Diagrams” and “Visio Extras”. The other 3 bazillion shapes in Visio can be distracting, and keeping just boxes, circles, and arrows on hand helps me to focus.
The goal of Step 1 is to drag a shape into the drawing for each thing in the idea I need to communicate. I’ll add text to the shapes, but I don’t worry about connectors, arrows, colors, formatting, or precise positioning. That’s all fluff that comes later. By sticking to the basics, I’ll only spend 5 minutes dragging and dropping instead of 25 minutes debating the various aesthetics of the “Reference Callout 1” shape versus the “Reference Callout 2” shape.
This diagram I’m working on has four boxes and a dump truck. Yes, I broke my own rules by adding clip art. The art only took an extra 10 seconds thanks to the clip art “search for” feature, and I’ll justify it later. I now have a diagram with all the “things” I need to manipulate.
Tomorrow evening we will take the diagram through step 2.
Q: I need my application to perform better. Do you know any good resources on .NET performance?
A: I know one great resource. The resource is the "Improving .NET Application Performance and Scalability" book from Microsoft's Patterns and Practices group (or whatever their name is this quarter). You can read the book online, download the PDF, or buy the 1152 page paperback.
The book includes chapters dedicated to manage code performance, ASP.NET performance, and ADO.NET performance, among others. There guide also include How To articles and checklists you can use for reviews. It's an oldie but a goodie.
MSBuild does a good job of reporting build errors, but MSBuild can only report errors that the underlying Tasks report. Custom tasks add a lot of variation to quality of the error messages. Case in point is the following message, which popped up as a deadline loomed.
Build FAILED.
    0 Warning(s)
    0 Error(s)

Time Elapsed 00:00:05.85
The build failed, but there are no errors to report. Yup. It's strange messages like this that make me want to curse in German, but I don't know German, so I make the noises an angry Klingon might make after living in Berlin for 5 years.
I couldn't find any problems in the output until I set MSBuild for maximum verbosity (/verbosity:diagnostic, /v:diag for short), at which point I found this in the output:
Done building target "PrepareRdlFiles" in project "...".
Target "RunRdlCompiler" in file "...":
  Building target "RunRdlCompiler" completely.
  Output file "obj\Debug\RdlCompile.compiled" does not exist.
  Using "RdlCompile" task from assembly "Microsoft.ReportViewer.Common ...".
  Task "RdlCompile"
  Done executing task "RdlCompile" -- FAILED.
Done building target "RunRdlCompiler" in project "CareAlertsWeb.csproj" -- FAILED.
Someone had added .rdlc files to the project. These are "Client Report Definition" files - think of Reporting Services reports without a report server. Something was going wrong compiling the .rdlc files, but there still wasn't any information to determine what the problem was. Without knowing what else to do I started looking at the RdlCompile task with Reflector.
The RdlCompile task is interesting. The task doesn't compile files in the traditional sense (transform inputs into outputs). The task validates the report definition inside the .rdlc file. This step ensures we'll get compile time errors instead of runtime errors from the ReportViewer control if the report definition is invalid.
The assembly hosting RdlCompile referenced another assembly that was not on the build machine (Microsoft.ReportViewer.ProcessingObjectModel). Mysterious. Why this caused the task to fail without reporting a more specific error is also a mystery.
With all the assemblies were in place, the RdlCompile task finished with success. Running ReportViewer.exe installs all the required assemblies, you can find it in %Program Files%\Microsoft Visual Studio 8\SDK\v2.0\BootStrapper\Packages\ReportViewer.

 OdeToCode by K. Scott Allen
 Subscribe
 Twitter
 Search
 About
About
 Learn C#