
Step 1 produced the raw materials we need. Step 2 is molding the raw materials into a comprehensible diagram. There is a fine line between making a diagram comprehensible and adding little touches for the sake of aesthetics. As time ticks on, remember the ultimate objective is to communicate ideas to a team of software developers, not sell the diagram at an art exhibition. We need something more permanent than a whiteboard sketch, but that only requires a minimum amount of time.
My first action is adjusting the font sizes in the diagram. The default size is too small to read easily, so I select all the objects in the diagram and crank up the font size (CTRL+A, right-click the diagram, Format -> Text).
Next, I’ll add connecting lines and arrows. I’m a fan of the “Dynamic Connector” for straight lines between shapes, and “Wavy Connector 1” for a less formal directional line. Connectors should always glue to a connection point because moving shapes around will be easier (the connectors will move with the shape). Many shapes already have connection points at logical locations (the small blue x symbol), but you can add or move connection points, too. Click the Connection Point Tool on the standard tool bar, select a shape, then hold down the CTRL key while clicking the location to add a connection point.
Finally, I’ll start moving shapes around to achieve alignment and symmetry. Nothing too fancy at this point, just make sure the spacing is consistent and that nothing is so unbalanced as to attract attention. Some tools that can help at this point include:
The align shapes dialog (Shape –> Align Shapes) can quickly align shapes along their centers, tops, bottoms, left sides, or right sides. CTRL + click shapes to select multiple shapes for aligning.

I use the Snap and Glue toolbar to toggle the snap feature (the first button in the toolbar). Snapping is a quick and easy way to get shapes spaced perfectly. I turn off the snap feature when I have some text I need to sit in the diagram at a precise location.
I find it easier to use the arrow keys instead of the mouse to move shapes. I get a precise amount of movement from a keystroke. Select a shape and use the arrow keys to make coarse movements. Hold down a Shift key when using the arrow keys for fine-grained movements.
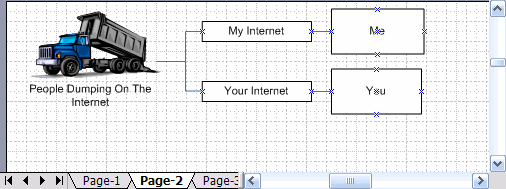
Finally, too much white space can make a diagram hard to comprehend. Step 2 can be an iterative process of moving, shaping, aligning, and compacting. The diagram should become smaller and more symmetrical. Here is our diagram after step 2.
Tune in tomorrow evening as we apply the final changes in step 3.

 OdeToCode by K. Scott Allen
 Subscribe
 Twitter
 Search
 About
About
 Learn C#