
In my Developing with Node.js on Azure course I show how to setup a Git repository in an Azure App Service.
When you push code into the repository, Azure will use heuristics to figure out the type of application you are pushing into the repository. The outcome of the heuristics will create a deployment script. If Azure decides you are pushing a Node.js application, for example, the deployment script has the following steps inside:
1. Sync files from the Git repo into the web site directory
2. Select the Node version*
3. Run npm install in the web site directory.
After these steps, most Node.js applications are ready to start.
A common set of questions I hear revolve around how to change the deployment script to add additional simple steps. Perhaps the project needs to run a transpiler or a tool like Webpack before the application can start.
You can write your own script from scratch or copy and modify the script from Azure. I'd suggest starting by looking at the script Azure generates first. Go to the Kudu website for the app service and select "Download deployment script" under the Tools menu.

In the script, near the bottom, is a :Deployment label and the three steps listed above. Here’s what I’ve added to one project’s deployment script to run webpack:
:: 4. run build step
pushd "%DEPLOYMENT_TARGET%"
call :ExecuteCmd !NPM_CMD! run build
IF !ERRORLEVEL! NEQ 0 goto error
popd
This customization doesn’t execute webpack directly, instead the customization executes an “npm run build” command. Any commands needed to build the app are encapsulated into a script or command found in package.json:
"scripts": {
  "serve": "webpack-serve --open --config webpack.config.js",
  "build": "webpack --mode production --config webpack.config.js"
},
One advantage to this approach is the ability to skip installing webpack as a global dependency. Instead, npm will search the node_modules/.bin folder for tools like webpack, grunt, gulp, and tsc. Although you can install tools globally in an app service plan, I tend to avoid global tools when possible and thunk through project.json instead.
You can now override Azure’s deployment script with your custom script by checking the script into your source code repository.
* Note the deployment script only uses the 2nd step if the App Service is Windows based. Otherwise the underlying container sets the Node.js version.
In addition to the .NET course, I've completely updated my Developing with Node.js on Azure course. In the course we'll build and deploy web applications, work with with Azure SQL and Cosmos DB, store files in Azure storage, develop and deploy Azure Functions, and set up a continuous delivery pipeline from VSTS to Azure App Services.

In previous posts we look at decryption with Azure Key Vault and how to think about the roles of the people and services interacting with Key Vault. In this post I want to call attention to an Azure feature that you can use in combination with Key Vault – the Managed Service Identity (MSI).
MSI helps to solve the Key Vault bootstrapping problem whereby an application needs access to a configuration secret stored outside of Key Vault to access all the secrets inside of Key Vault.
First, here’s the Startup code from the earlier post about decryption. This code needs an application ID and an application secret to access Key Vault.
AuthenticationCallback callback = async (authority,resource,scope) =>
{
    var appId = Configuration["AppId"];
    var appSecret = Configuration["AppSecret"];

    var authContext = new AuthenticationContext(authority);
    var credential = new ClientCredential(appId, appSecret);
    var authResult = await authContext.AcquireTokenAsync(resource, credential);
    return authResult.AccessToken;
};

var client = new KeyVaultClient(callback);
If this code is running in an environment where Azure Managed Service Identity is available, we could enable MSI, install the Microsoft.Azure.Services.AppAuthentication NuGet package, and then replace the code from above with the following.
var tokenProvider = new AzureServiceTokenProvider();
var callback = new AuthenticationCallback(tokenProvider.KeyVaultTokenCallback);
return new KeyVaultClient(callback);
Not only is the code simpler, but we don’t need to explicitly create and manage an application secret that gives the application access to Key Vault. People who talk to me about Key Vault worry about this secret because this is the secret that grants access to all other secrets. With MSI, the master secret isn’t explicitly required by the application. However, a secret is still in play. MSI makes the secret safer and easier to use.
MSI is a feature of Azure AD available to specific types of services in Azure, including VMs, App Services, and Functions. When you create one of these services you have the option to enable MSI in the portal or with the command line. For an App Service I can enable MSI using:
az webapp assign-identity –resource-group {group} –name {name}
This command will create a managed identity for my app service. If the app service goes away, the managed identity goes away. Azure also takes care of rolling the credentials. 
Enabling MSI for a resource also enables a local token endpoint for the resource. In an app service, this endpoint looks like http://127.0.0.1:41068/MSI/token/. This endpoint is where the AzureServiceTokenProvider can go to pick up a token. All the provider needs is a secret. For App Services, both the endpoint and the secret are available as environment variables.

I like to see how software fails, so I had to run the app using an AzureServiceTokenProvider on my local laptop - far away from MSI environment variables and token endpoints.
To my surprise, the application was able to read a secret in Key Vault.
It turns out that AzureServiceTokenProvider has more than one strategy for obtaining a bearer token. One approach is to use the local MSI endpoint provided by Azure when running in Azure, but another approach is to use the Azure CLI. If you are logged in with the Azure CLI, the token provider can use the equivalent of the following to obtain an access token.
az account get-access-tokenA different token provider can obtain a token via Visual Studio.
Summary
More and more services in Azure can now use Azure AD authentication, including Service Bus and as of May, Azure Storage. Using MSI in combination with the AzureServiceTokenProvider makes Azure AD authentication easier and safer.
May 6th - I’m on a plane thinking back to a dinner two years ago at the Sjøflyhavna Kro. This restaurant sits along the water west of Oslo on the Fornebu peninsula. There’s a functioning dock for seaplanes on the side of the restaurant. Kjersti from NDC conferences is at the table and firing off a stream of questions.
Are you having a good week? Yes!
Do you think he will win the election? No!
Should we try to bring an NDC event to the U.S? You absolutely must bring NDC to the states! And soon!
Where should we host the conference? How about on the east coast - near my home?
This last answer I gave with a grin.
Fast forward 2 years and I’m on a Sunday night flight from Washington D.C. to Minneapolis. I’m going to speak at the first NDC event in the U.S! Although Minnesota isn’t exactly near my home, it is 4 time zones closer than any other NDC event. During the trip, I keep thinking back to my stays in Fornebu – home base for the NDC team.
Fornebu
Fornebu, like the NDC conference schedule, has grown dramatically in the last 10 years.
Let’s go back even further to June 1939. This is when the Oslo Airport officially opened for business in Fornebu. 1939 wasn’t the best year to open an airport in Europe as the start of WW2 was only three months away, and eventually Norway, with her North Sea ports and access to iron ore in Sweden, was of interest to both the Allies and the Third Reich. It was the Third Reich that moved first. For five years the Norwegian royal family lived in exile and the Oslo airport was a military airbase for the Deutsche Luftwaffe. One of the remarkable stories of resistance during this period is the story of Operation Gunnerside, a story where 9 Norwegian commandos destroy a power facility in the mountains between Oslo and Bergen to guarantee the Nazis can’t use the plant’s heavy water to make an atomic weapon.

By the time I first set foot in Fornebu, the Oslo airport had moved far to the north in Gardermoen, leaving behind empty hangers and a large terminal building. It’s inside the former terminal building where I taught my first class in Norway at the ProgramUtvikling classrooms (PU being the company behind the NDC conferences). I remember having lunch with students in the cafeteria and someone mentioning that we were eating in the former baggage claim area. Ever since that comment I look at the conveyors for the cafeteria trays and picture Samsonite luggage rolling out of the dishwasher.
During my first trip here, I thought Fornebu was “out there” – in the sense there wasn’t much to do in the area other than eat at the single seaplane restaurant. Most teachers and out of town students preferred to stay in central Oslo and commute to class.
If you go to the peninsula today, only 10 years after my first class, there’s a variety of restaurants and hotels to choose from, as well as a shopping mall, waterfront apartments, an arena with seating for 20,000 fans, and office buildings with seating for 30,000 human resources.
One of the old airport hangars is now an indoor golf facility. I’ve gone over a few times over the years to hit balls and play golf in a simulator. The facility is only open during the winter months, of course, because you can’t keep a Norwegian indoors during the summer.
I feel fortunate to have witnessed both Fornebu and NDC conferences grow over the years. What was at one time an abandoned airport is now a thriving, eco-friendly community. What was at one time a single event in the heart of Oslo is now a worldwide tour, a traveling circus if you will, of speakers and attendees coming together for a special summit.
Go Vikings!
Although I suggested the east coast, in hindsight, Minnesota is the perfect place for a Norwegian Developers Conference in the U.S. More people in Minnesota claim a Norwegian ancestry than any other state. The professional football team is the Vikings, and if you watch carefully when moving around the twin cities of Minneapolis and St. Paul, you’ll occasionally see the other red, white, and blue flag – the Norwegian flag – affixed as a sticker or hanging on a smokestack.
Norwegians came to the states for the same reasons as other Europeans - to escape from religious persecution, or famine, or both. Many settled in the northern mid-west states like Minnesota, Wisconsin, and the Dakotas. Like Norway, these states are lush and green in the summer with a healthy dose of chilly weather in the winter. Also, like Norway, large blocks of ice once ravaged the area leaving behind some exceptional geological features.
These are my thoughts as the plane descends into the Minneapolis-Saint Paul International airport.
Only one hour later and I’m checked into my hotel room overlooking the upper Mississippi river, and I’m remembering a quote by Mark Twain. “The Mississippi River will always have its own way; no engineering skill can persuade it to do otherwise.”
I could say the same about certain front-end programming frameworks, but that’s a different topic for another day.

The Workshop
May 7th – It’s breakfast time on day one of a two-day workshop on ASP.NET Core. I’m always excited on the morning of a workshop, although I admit there is a bit of trepidation, too. Much of the trepidation exists because I know for the next 36 hours I’ll not be able to do much more than speak, eat, and sleep. No time for email or finishing a movie. I’ll need to spend most of my time in the evening preparing for day two. I can’t believe I used to do 5-day workshops when I first started teaching for Pluralsight. I must have been much, much younger then.
But, I am excited. I still love teaching, and for this workshop the morning session is always motivating. I show some of the low-level machinery of .NET Core and ASP.NET Core that turns on light bulbs for even experienced Core developers.

By the end of the second day I’ve spent most of the time writing code for the group, answering good questions, and occasionally talking through a slide or two. Although for this workshop, I spend most of my time with slides as a short refresher after writing demo code, as in “let’s visit the slides to see if I forgot anything!” The room was comfortable, and I think the participants were pleased.
At the end of the workshop, my brain and vocal chords are begging for some down time. I saunter over to the St. Paul Grill alone. The Grill is not as old as all the dark mahogany inside would suggest, but I remember the food and drink from a previous trip as being excellent. I feel awkward sitting at a proper dining table by myself, so I take a seat at the bar and prepare to mindlessly watch a Warriors – Pelicans playoff game. Unfortunately for my vocal chords, the bar is full of gregarious patrons and a bartender with classical barkeep communication skills. It’s all good, though, and the meal is excellent. Afterwards I meander across the street for a digestif and take a seat with fellow workshop instructors Brock and Michelle. 
The Conference
May 9th – The conference opens at the St. Paul RiverCentre. Even the venue name looks European. Hundreds of attendees start to arrive, and I’m thrilled to see the first NDC on U.S. soil get underway with a keynote by Dylan.
Unlike most events here in the U.S., the NDC conference does not operate under the influence of a software vendor. Nor is the conference overrun by evangelists and professional speakers from a software vendor. There’s a wide variety of topics and a sizable number of independent thinkers. No speaker here will be censored, or censured, for speaking critically about products or frameworks, which I can’t say for other conferences here in the states. It’s one of many things that makes NDC unique, special, and worthy of promotion.
Unfortunately for me, I can’t stick around long after my talk on this first day. After cutting back on conferences in 2017 I am now on my first trip of five trips over the next six weeks. I take a car ride to the airport in the afternoon, and land at Dulles airport in the evening.
I have a little game I like to play starting in the Dulles airport parking lot. The game is “beat the GPS”. If I ask the GPS to go home, the GPS will direct me to head east and take large highways like the D.C. beltway and the 8 lanes of interstate 270. Hoping that you won’t run into traffic problems on the D.C beltway is like hoping you won’t get wet while white water rafting.I prefer to head west on the small country roads of Virginia. I start the game and the AMG exhaust crackles through the spring Virginia air. This night I win and beat the GPS estimate by 5 minutes.
I'm home, but only for a couple days.
I completely re-worked my Developing with .NET on Microsoft Azure course earlier this year, and the new videos are now available.
Here are some of the changes from the previous version of the course:
- I show how to use the Azure CLI for Azure automation from the command line. The CLI works across platforms and the commands are easy to discover.
- I show how to setup a local Git repository in an Azure App Service and demonstrate how to deploy ASP.NET Core apps from the repo.
- The Azure Functions module uses the new 2.0 runtime to develop a function locally.
- The Azure Function is a function using blob storage, Cognitive Services, and Azure CosmosDB.
- Numerous other changes to catch up with new features in Azure and VSTS
Enjoy!

Here are some other topics you'll see covered in the course:
- Develop and deploy an ASP.NET Core application to Azure App Services
- Manage configuration settings for an App Service
- Monitor and scale an App Service
- Work with input and output bindings in Azure Functions
- Create a git repository with a remote in VSTS or Azure App Services
- Setup a build and release pipeline using VSTS for continuous deployment
- Connect to Azure storage using the Portal, C# code, and Azure Storage Explorer
- Save and retrieve files from blob storage
- Configure alerts
- Monitor performance metrics using Application Insights
- Choose an API for CosmosDB storage
- Create and read documents in CosmosDB
- Create and read records in Azure SQL using Entity Framework Core
In an earlier post we looked at decrypting an asymmetric key using Key Vault. After decryption, we could use the key to decrypt other secrets from Key Vault, like encrypted connection strings.
This raises the question – do we need to encrypt our secrets in Key Vault? If we still need to encrypt our secrets, what value does Key Vault provide?
The short answers are maybe, and a lot.
It’s not a requirement to encrypt secrets before storing the secrets into key vault, but for those of use who work in highly regulated industries, it is difficult to justify to an auditor why we are not encrypting all sensitive pieces of information.
Keep in mind that Key Vault already encrypts our secrets at rest and will only use secure communication protocols, so secrets are safe on the network, too. The only benefit of us encrypting the secret before giving the secret to key vault is to keep the plain text from appearing in the portal or as the output of a script.
For applications running outside of “encrypt all secrets no matter the cost” mandates, the built-in safety mechanisms of Key Vault are good enough if you follow the right practices.
Key Vault allows us to separate the roles of key managers, key consumers, and developers. The separation is important in the production data environment.
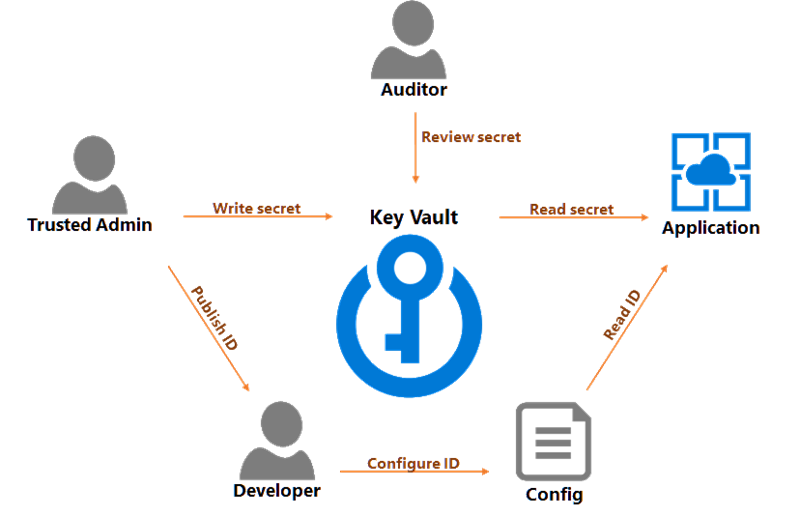
The security team is the team who can create key vaults for production and create keys and secrets inside a vault. When a system needs access to a given database, the security team can create a login for the application, then add the connection string as a secret in the vault. The team can then give developers a URL that leads to the secret.
Developers never need to read or see the secret. Developers only need to place the secret URL in a location where the running application can retrieve the URL as a parameter. The location could be a configuration file, or developers could place the URL into an ARM template to update application settings during a deployment.
The security team grants the application read access to secrets in the Key Vault. At run time, an application can read a connection string from the vault and connect to a database.
Finally, an auditor can review access logs and make sure the security team is rotating keys and secrets on a regular basis.
Best security practices require periodic changes to passwords and access keys. Azure services that rely on access keys enable this scenario by providing two access keys – a primary and secondary. Azure Key vault also helps with this scenario by versioning all secrets in the vault and allowing access to multiple versions (this month's key, and last month's key, for example). We can also roll connection strings.
Take the following scenario as an example.
1. Security team creates a login for an application in Azure SQL. They place a connection string for this login into Key Vault. We'll call this connection string secret C1.
2. Devops deploys application with URL to the C1 secret.
3. After 30 days, security team creates a new login for application. They place the connection string in KeyVault. This is C2.
4. At some point in the next 30 days, devops will deploy the application and update the URL to point to C2.
5. After those 30 days, security team removes the login associated with C1.
6. GOTO 1
Key Vault is an important piece of infrastructure for applications managing sensitive data. Keeping all the secrets and keys for a system in Azure Key Vault not only helps you protect those secrets, but also gives you a place to inventory and audit your secrets.
The next few posts are tips for developers using Azure Key Vault.
The documentation and examples for Key Vault can be frustratingly superficial. The goal of the next few posts is to clear up some confusion I’ve seen. In this first post we’ll talk about encryption and decryption with Key Vault.
But first, we’ll set up some context.
Over the years we’ve learned to treat passwords and other secrets with care. We keep secrets out of our source code and encrypt any passwords in configuration files. These best practices add a layer of security that helps to avoid accidents. Given how entrenched these practices are, the following line of code might not raise any eyebrows.
var appId = Configuration["AppId"];
var appSecret = Configuration["AppSecret"];

var encyptedSecret = keyVault.GetSecret("dbcredentials", appId, appSecret");

var decryptionKey = Configuration["DecryptKey"];
var connectionString = CryptoUtils.Decrypt(encryptedSecret, decryptKey);
Here are three facts we can deduce from the above code.
1. The application’s configuration sources hold a secret key to access the vault.
2. The application needs to decrypt the connection strings it fetches from the vault.
3. The application’s configuration sources hold the decryption key for the connection string.
Let’s work backwards through the list of items to see what we can improve.
Most presentations about Key Vault will tell you that you can store keys and secrets in the vault. Keys and secrets are two distinct categories in Key Vault. A secret can be a connection string, a password, an access token, or nearly anything you can stringify. A key, however, can only be a specific type of key. Key Vault’s current implementation supports 2048-bit RSA keys. You can have soft keys, which Azure encrypts at rest, or create keys in a hardware security module (HSM). Soft keys and HSMs are the two pricing tiers for Key Vault.
You can use an RSA key in Key Vault to encrypt and decrypt data. There is a special advantage to using key vault for decryption which we’ll talk about in just a bit. However, someone new to the cryptosystem world needs to know that RSA keys, which are asymmetric keys and computationally expensive compared to symmetric keys, will only encrypt small amounts of data. So, while you won’t use an RSA key to decrypt a database connection string, you could use an RSA key to decrypt a symmetric key the system uses for crypto operations on a database connection string.
The .NET wrapper for Azure Key Vault is in the Microsoft.Azure.KeyVault package. If you want to use the client from a system running outside of Azure, you’ll need to authenticate using the Microsoft.IdentityModel.Clients.ActiveDirectory package. I’ll show how to authenticate using a custom application ID and secret in this post, but if you are running a system inside of Azure you should use a system’s Managed Service Identity instead. We’ll look at MSI in a future post.
The Key Vault client has a few quirks and exposes operations at a low level. To make the client easier to work with we will create a wrapper.
public class KeyVaultCrypto : IKeyVaultCrypto
{
    private readonly KeyVaultClient client;
    private readonly string keyId;

    public KeyVaultCrypto(KeyVaultClient client, string keyId)
    {
        this.client = client;
        this.keyId = keyId;
    }

    public async Task<string> DecryptAsync(string encryptedText)
    {
        var encryptedBytes = Convert.FromBase64String(encryptedText);
        var decryptionResult = await client.DecryptAsync(keyId,
                                 JsonWebKeyEncryptionAlgorithm.RSAOAEP, encryptedBytes);
        var decryptedText = Encoding.Unicode.GetString(decryptionResult.Result);
        return decryptedText;
    }

    public async Task<string> EncryptAsync(string value)
    {
        var bundle = await client.GetKeyAsync(keyId);
        var key = bundle.Key;

        using (var rsa = new RSACryptoServiceProvider())
        {
            var parameters = new RSAParameters()
            {
                Modulus = key.N,
                Exponent = key.E
            };
            rsa.ImportParameters(parameters);
            var byteData = Encoding.Unicode.GetBytes(value);
            var encryptedText = rsa.Encrypt(byteData, fOAEP: true);
            var encodedText = Convert.ToBase64String(encryptedText);
            return encodedText;
        }
    }
}
Here are a few points about the code that may not be obvious.
First, notice the EncryptAsync method fetches an RSA key from Key Vault and executes an encryption algorithm locally. Key Vault can encrypt data we post to the vault via an HTTPS message, but local encryption is faster, and there is no problem giving a system access to the public part of the RSA key.
Secondly, speaking of public keys, only the public key is available to the system. The API call to GetKeyAsync doesn’t return private key data. This is why the DecryptAsync wrapper method does use the Key Vault API for decryption. In other words, private keys never leave the vault, which is one reason to use Key Vault for decryption instead of bringing private keys into the process.
The steps for creating a vault, creating a key, and granting access to the key for an application are all steps you can find elsewhere. Once those steps are complete, we need to initialize a KeyVaultClient to give to our wrapper. In ASP.NET Core, the setup might look like the following inside of ConfigureServices.
services.AddSingleton<IKeyVaultCrypto>(sp =>
{
    AuthenticationCallback callback = async (authority,resource,scope) =>
    {
        var appId = Configuration["AppId"];
        var appSecret = Configuration["AppSecret"];
        var authContext = new AuthenticationContext(authority);

        var credential = new ClientCredential(appId, appSecret);
        var authResult = await authContext.AcquireTokenAsync(resource, credential);
        return authResult.AccessToken;
    };

    var client = new KeyVaultClient(callback);
    return new KeyVaultCrypto(client, Configuration["KeyId"]);
});
In the above code we use an application ID and secret to generate an access token for Key Vault. In other words, the application needs one secret stored outside of Key Vault to gain access to secrets stored inside of Key Vault. In a future post we will assume the application is running inside of Azure and remove the need to know a bootstrapping secret. Otherwise, systems requiring encryption of the bootstrap secret should use a DPAPI library, or for ASP.NET Core, the Data Protection APIs.
Now that we know how to decrypt secrets with private keys in Key Vault, the application no longer needs to store a decryption key for the connection string.
var encyptedSecret = keyVault.GetSecret("dbcredentials", appId, appSecret);
var connectionString = keyVault.Decrypt(encryptedSecret, decryptionKeyId);
We'll continue discussing this scenario in future posts.

 OdeToCode by K. Scott Allen
 Subscribe
 Twitter
 Search
 About
About
 Learn C#