
Data validation is important in web applications. Before accepting data from over the network you need to ensure all of the required fields have been filled out and conform to your formats and business rules. ASP.NET provides a number of validation controls to ease the burden of performing validation on both sides of the network. These controls are the main focus of this article.
Validation Example
To walk along with the example, create a new web application in Visual Studio .NET. Once the application is setup, right click on the empty web form, select Properties from the context menu, and change the PageLayout property to FlowLayout.
Design the Form
Place four controls from the Web forms section of the Toolbox onto the form. Drag one TextBox control and give it an ID of FirstNameTextBox, two Button controls (SubmitButton and CancelButton), and one RequiredFieldValidator (FirstNameRequiredFieldValidator).
This RequiredFieldValidator forces the user to enter text into the control associated with the validator. The associated control is set by right clicking on the validator and selecting Properties from the context menu. In the Properties dialog box find the ControlToValidate property and select FirstNameTextBox from the drop down list. First name is now a required field in the form. We can set other properties, such as the ErrorMessage property, and the final ASPX source code should look like the following.
<%@
    Page language="c#" Codebehind="WebForm1.aspx.cs"
    AutoEventWireup="false" Inherits="WebDataValidation.WebForm1"
%>
<!DOCTYPE HTML PUBLIC "-//W3C//DTD HTML 4.0 Transitional//EN" >
<HTML>
  <HEAD>
    <title>WebForm1</title>
  </HEAD>
  <body>
    <form id="Form1" method="post" runat="server">
      <P>
        First name</P>
      <P>
        <asp:TextBox id="FirstNameTextBox" runat="server"></asp:TextBox>
        <asp:RequiredFieldValidator
             id="FirstNameRequiredFieldValidator"
             runat="server"
             ErrorMessage="First name is required"
             ControlToValidate="FirstNameTextBox">
         </asp:RequiredFieldValidator></P>
      <P>
        <asp:Button id="SubmitButton" runat="server" Text="Submit">
        </asp:Button>

        <asp:Button id="CancelButton" runat="server" Text="Cancel"
             CausesValidation="False">
         </asp:Button>
      </P>
    </form>
  </body>
</HTML>
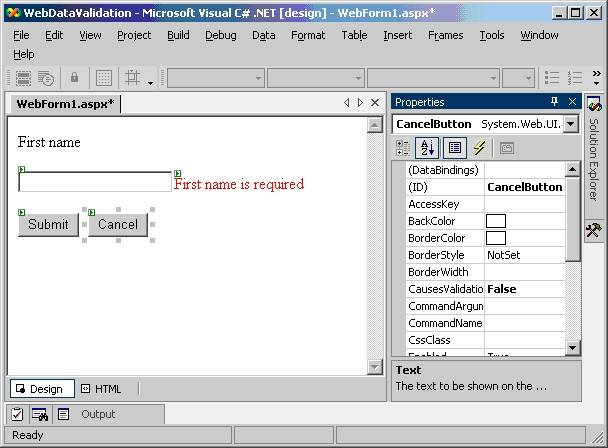
The cancel button has a CausesValidation property. Validation occurs when a user clicks any Button control by default, but you can change this behavior by setting the CausesValidation property to false. As we will see later in the code-behind file, the CancelButton will clear all of the fields on the form, and we do not want to validate any of the fields when the user presses this button. Notice in the following screen capture, we can see the RequiredFieldValidator error message display on the form. This is the exact position the error message will appear if validation fails.
Adding the Code
For this first example we do not need to place much code into the code-behind file. We can double click on both of the Button controls on the form to add event handlers for the click events. The complete listing for WebForm1.aspx.cs is shown below.
using System;
using System.Collections;
using System.ComponentModel;
using System.Data;
using System.Drawing;
using System.Web;
using System.Web.SessionState;
using System.Web.UI;
using System.Web.UI.WebControls;
using System.Web.UI.HtmlControls;

namespace WebDataValidation
{
    public class WebForm1 : System.Web.UI.Page
    {
        protected System.Web.UI.WebControls.Button CancelButton;
        protected System.Web.UI.WebControls.TextBox FirstNameTextBox;
        protected System.Web.UI.WebControls.RequiredFieldValidator
                                        FirstNameRequiredFieldValidator;
        protected System.Web.UI.WebControls.Button SubmitButton;

        private void Page_Load(object sender, System.EventArgs e)
        {
            // Put user code to initialize the page here
        }

        #region Web Form Designer generated code
        override protected void OnInit(EventArgs e)
        {
            //
            // CODEGEN: This call is required by the ASP.NET Web Form
            // Designer.
            //
            InitializeComponent();
            base.OnInit(e);
        }

        private void InitializeComponent()
        {
            this.SubmitButton.Click += new
                           System.EventHandler(this.SubmitButton_Click);
            this.CancelButton.Click += new
                           System.EventHandler(this.CancelButton_Click);
            this.Load += new System.EventHandler(this.Page_Load);

        }
        #endregion

        private void SubmitButton_Click(object sender,
                                        System.EventArgs e)
        {
            if(Page.IsValid)
            {
                //process input here
            }
        }

        private void CancelButton_Click(object sender,
                                        System.EventArgs e)
        {
            FirstNameTextBox.Text = "";
        }
    }
}
When the user clicks the Cancel button we clear the TextBox control and allow the user to start over. Notice we need to check the IsValid property of the base class before performing any critical action in the submit event. If IsValid returns a value of true then all of the validation checks were successful. The following screen shows the form in action, and the user has pressed the Submit button without entering any text into the textbox. The IsValid property returns false in this case.

The RequiredFieldValidator fails when the value in the associated control matches the value of the InitialValue property of the RequiredFieldValidator. If you want to make sure the user changes a default value placed into the control, set the control’s Text value and the InitialValue property of the RequiredFieldValidator to the same value.
Web Validation
The rest of the validation controls provided by ASP.NET work in a similar fashion to what we've seen above. As we mentioned in the beginning of the article, validation can occur twice: once on the client’s machine and once on the server. It is important to understand why ASP.NET will go to this trouble.
Client Side Validation
If the client's web browser is of executing client side JavaScript, the first validation pass occurs on the client. Client side validation provides quick feedback for the user. Whenever the user presses a button on the form, the script executes the validation checks for each validation control on the form. If any one of the validation controls on a form fails, the script cancels the postback operation and displays error messages on the form. The user does not wait on a server round trip to discover errors. This also improves response time on the server because the ASP.NET runtime does not waste time processing a request with invalid information. If you want to disable just client side validation for a specific validation control, you can set the control’s EnableClientScript property to false.
Server Side Validation
ASP.NET will always execute validation checks on the server when a button click event arrives requiring validation. You can disable any of the validation controls by setting the Enabled property to false.
There are good reasons to always execute validation checks on the server. Not executing server side validation leaves your application code vulnerable to malicious users. Malicious users might circumvent client side validations in an effort to break-in or damage your servers. Simply put, never trust the data in an incoming request, and always validate on the server.
When validation fails the normal flow of execution continues. You need to check the IsValid property to know if a validation check failed. Validation is complete by the time you reach a click event.
There are various validation controls availabe, and we will cover them in the rest of the article. All of the validation controls derive from the BaseValidator class, giving them common methods and properties. As we mentioned earlier, validation controls execute when the user clicks a Button control, including HTML button controls and server button controls such as the LinkButton and ImageButton.
All of the validation controls must have the ControlToValidate property set before rendering the page or the control throws an exception. The one exclusion to this rule is the CustomValidator component. You can validate the following server controls: TextBox, ListBox, DropDownList, RadioButtonList, and the following HTML controls: HtmlInputText, HtmlInputFile, HtmlSelect, and HtmlTextArea. We have seen the RequiredFieldValidator in our first sample program, let’s move on to examine the rest of the controls.
RangeValidator
The RangeValidator control ensures the value inside a control is within a specified range. There are four key properties to initialize for a RangeValidator. The ControlToValidate property references the ID of the input control to check. The MinimumValue and MaximumValue properties control the allowed range of the input.
The RangeValidator also has a Type property. This property can take one of the following values: String, Integer, Double, Date, or Currency. The RangeValidator will first try to convert the values it is examining into the type specified. If the conversion fails, the validation also fails.
To demonstrate the RangeValidator, we will add an additional TextBox control to our web form (HireDateTextBox), and a RangeValidator. We want to make sure a user enters a hire date, the date is in a valid format, and the data is within one week (plus or minus) of today’s date. The code in our ASPX file should look like the following.
<P>Hire date</P>
<P>
  <asp:TextBox
       id="HireDateTextBox" runat="server">
  </asp:TextBox>
  <asp:RangeValidator
       id="HireDateValidator"
       runat="server"
       ControlToValidate="HireDateTextBox"
       ErrorMessage="Hire date must be within one week of today's date"
       Type="Date"
       Display="Dynamic">
  </asp:RangeValidator>
  <asp:RequiredFieldValidator
       id="HireDateRequiredFieldValidator"
       runat="server"
       ControlToValidate="HireDateTextBox"
       ErrorMessage="Hire Date is required">
  </asp:RequiredFieldValidator>
</P>
Using Multiple Validation Controls
In the above example we have tied two validation controls to the HireDateTextBox. The RangeValidator does not validate the contents of an input control if the control is empty. In order to require the user to enter a date in this field we will need both the RequiredFieldValidator and the RangeValidator. Without the RequiredFieldValidator, the user does not have to type a value into the HireDateTextBox control, but if they do it must be in a proper date format and in the specified range.
When multiple validation controls reference an input, all the validation checks must pass for the field to be valid.
Programmatic Access to Validation Controls
Validation controls are available as member variables in the code behind page. We can place the following code in our Page_Load method to initialize the MinimumValue property with last week’s date, and the MaximumValue property with next week’s date.
private void Page_Load(object sender, System.EventArgs e)
{
    // Put user code to initialize the page here
    if(!Page.IsPostBack)
    {
        DateTime nextWeek = DateTime.Today + TimeSpan.FromDays(7);
        DateTime lastWeek = DateTime.Today - TimeSpan.FromDays(7);

        HireDateValidator.MaximumValue = nextWeek.ToShortDateString();
        HireDateValidator.MinimumValue = lastWeek.ToShortDateString();
    }
}
Displaying Error Messages
Notice we are setting a Display property for the RangeValidator. The Display property can accept one of three values: None, Static, or Dynamic. If the Display property is set to None, no errors are displayed where the validation control is placed on the form. We will see an example of using a Display of None later in the chapter when we look at the ValidationSummary control.
The Static and Dynamic settings will influence the layout of your page. With the static setting, the control reserves space to display an error message even when no error message is present. You can use the static setting to ensure your page appearance stays exactly the same when an error message appears. With a Dynamic display, there is no space reserved for the error message. Instead, when validation fails and the control displays an error, the control adds space to the page for the error to appear, which can change the layout of the screen. Note these two settings are only effective if client side validation is in effect. If you are have server side validation only, the display is effectively dynamic.
We are using a Display setting of Dynamic so we reserve no space for the RangeValidator error message. You can modify these properties in the example program to see the result of using different settings.
CompareValidator
Use the CompareValidator to compare the value of an input control to either a constant value, or the value in another input control. You can set the ValueToCompare property at design time or programmatically as the value to compare against. Alternatively, if you want to compare the input value against the value of another control, specify the other control ID in the ControlToCompare property. Like the RangeValidator, the CompareValidator has a Type property you can set to String, Integer, Double, Date, or Currency. The value in the ControlToValidate must convert to this type for validation to succeed.
For the example we will use the scenario of entering a new password. The TextBox control’s TextMode property is set to Password. When the user types a password the letters will display as asterisks. Since it is difficult for the user to know if they made a typing mistake, users are generally given two input controls: one to enter the password and another to confirm the password. These input values have to match for a valid password.
In the ASPX excerpt below, we have added two TextBox controls to the web form. We will validate that the password match by adding a CompareValidator with the ControlToValidate property referencing one password input and the ControlToComapre property referencing the second. Note, we would need to add a RequiredFieldValidator if we want to prevent the user from submitting the form with empty password inputs.
<P>Password</P>
<P>
  <asp:TextBox
       id="PasswordTextBox1"
       runat="server"
       TextMode="Password">
  </asp:TextBox></P>
<P>Confirm Password</P>
<P>
  <asp:TextBox
       id="PasswordTextBox2"
       runat="server"
       TextMode="Password">
  </asp:TextBox>

  <asp:CompareValidator
       id="PasswordCompareValidator"
       runat="server"
       ControlToValidate="PasswordTextBox2"
       ErrorMessage="Passwords do not match"
       ControlToCompare="PasswordTextBox1">
  </asp:CompareValidator>
</P>
RegularExpressionValidator
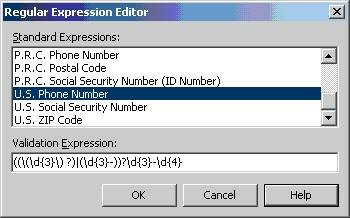
The RegularExpressionValidator is a powerful control you can use to match input against a pattern. This is the control to use when you need to ensure the user enters a phone number or email address in the correct format. ASP.NET offers some predefined regular expressions in the editor dialog (shown below).
An example of using the regular expression validator can be seen in the OdeToCode article: Validating Phone Numbers with Extensions in ASP.NET.
CustomValidator
You'll need to use a custom validator when none of the built in controls fir your need. You might need this if your validation requires a database query, or a non-trivial mathematical expression.
CustomValidator Example
Drop a CustomValidator onto a web form and adjust the properties to match those shown in the ASPX excerpt below Notice we have set the ControlToValidate property since we do know at design time the control we need to validate.
<P>Photo URL</P>
<P>
  <asp:TextBox
       id="PhotoUrlTextBox"
       runat="server">
  </asp:TextBox>
  <asp:RegularExpressionValidator
       id="PhotoUrlRegularExpressionValidator"
       runat="server"
       ErrorMessage="Not a valid URL"
       ValidationExpression=
          "http://([\w-]+\.)+[\w-]+(/[\w- ./?%&=]*)?"
       ControlToValidate="PhotoUrlTextBox"
       Display="Dynamic">
  </asp:RegularExpressionValidator>
  <asp:CustomValidator
       id="PhotoUrlCustomValidator"
       runat="server"
       ControlToValidate="PhotoUrlTextBox"
       ErrorMessage="Unsupported file format"
       ClientValidationFunction="validate_photoformat">
  </asp:CustomValidator>
</P>
Adding Client Side Validation
In the excerpt above you should notice the ClientValidationFunction property. This property is specific to the CustomValidator, and allows you to present the name of a function existing in client side script. If this property is not set, you can still perform a server side validation. We will need to implement this function in client side script by adding code to the ASPX file inside of a script tag.
<script language="javascript">
  function validate_photoformat(oSrc, args)
  {
    args.IsValid = false;
    if(args.Value)
    {
       var length = args.Value.length;
       var endsWidth = args.Value.substr(length - 3, 3);
       if(endsWidth == "jpg")
       {
         args.IsValid = true;
       }
    }
  }
</script>
Notice the name of the function matches the value of the ClientValidationFunction property. The function signature must take two variable references. The second variable passed to the function (args) is the primary variable we need to make use of. The IsValid member we use to indicate if the validation has passed or failed, while the Value member contains the text in the control to validate. If there was no control specified with the ControlToValidate property of the CustomValidator, the Value property contains an empty string.
In order to write client side validation functions you’ll need to lean a little about JavaScript, which we do not cover in this book. However, the source code shown above should be fairly readable if you have some C#, C++, or Java experience. We simply take the last three characters of the incoming text to see if they contain the string jpg. If the test is positive, we can pass validation by setting the args IsValid property to true.
Adding Server Side Validation
To provide a server side implementation of our validation code we need to provide an event handler for the ServerValidate event of the CustomValidator. Right click the control and click Properties on the context menu, then switch to the event view of the Properties dialog. After double clicking on the ServerValidate event, the IDE should take you to the code-behind file with an empty event handler. The following code provides our implementation.
private void PhotoUrlCustomValidator_ServerValidate(
                                    object source,
                                    ServerValidateEventArgs args)
{
  args.IsValid = false;
  if(args.Value != null)
  {
    int length = args.Value.Length;
    string endsWidth = args.Value.Substring(length - 3);
    if(endsWidth == "jpg")
    {
      args.IsValid = true;
    }
  }
}
Notice the code in our server side validation is not very different from the JavaScript version. The method accepts two parameters, with the second parameter of type ServerValidateEventArgs contains the important IsValid and Value properties.
Programmatic Validation
If the need arises, you can force validation checks to occur. As an example, you may pre-populate a form during initialization with information, and this occurs before the user has a chance to interact with the form. During Page_Load, you might want to check the IsValid property of the page to see if the pre-populated data will validate. Without adding an additional step, however, a call to IsValid produces the following error.

Calling the Validate method of the Page before checking the IsValid property will fix the exception shown above. This is the same method used by the ASP.NET runtime when a user presses a Button control with the CausesValidation property set to true. If we place this call in the Page_Load method as shown below, any validation errors will appear on the first page view for the user.
private void Page_Load(object sender, System.EventArgs e)
{
    // Put user code to initialize the page here
    if(!Page.IsPostBack)
{
    Page.Validate();
    if(!Page.IsValid)
    {
         // we expect this to fail
    }
}
At this point we should have a basic understanding of all the validation controls available in .NET. Our next step is to put everything together into a working form to submit a new employee record into the database. We also have one last control to cover: the ValidationSummary control.
ValidationSummary Control
You can use the ValidationSummary control to display all of your validation errors in a single location of the web form. There are only a few simple steps to achieve this behavior. After you drop a ValidationSummary control on a web form, chose how you want to display the errors by setting the DisplayMode property of the control to List, BulletList, or SingleParagraph. You probably want to try each of these settings to see which looks best with your form layout.
If you do not want the validation controls themselves to display errors on the form, set the Display property for each control to false. This will force the ErrorMessage to display only inside the ValidationSummary control.
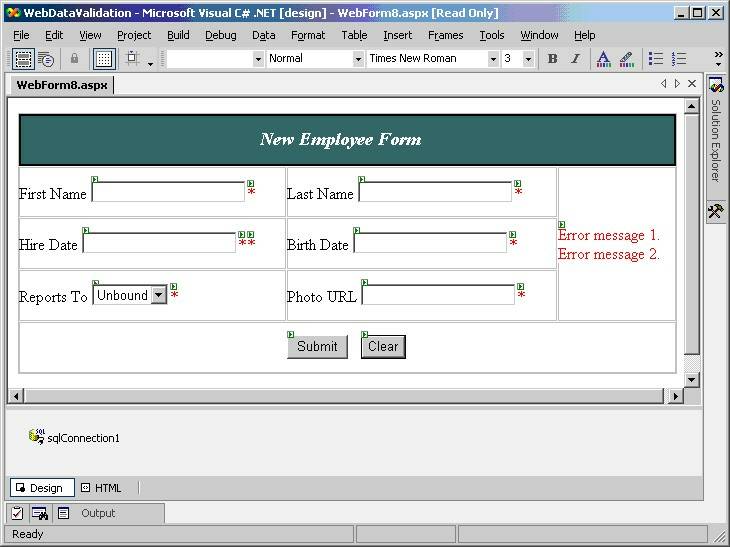
Designing With the ValidationSummary
In the design view of the following form, we have placed the validation control on the right side of the form with the DisplayMode property set to List. You’ll find many of the same validation controls we have used throughout the chapter in this form. The control names appear inside of brackets ([ ]) when the Display property is set to None.

While there is no new code in place to use the ValidationSummary control (the runtime will automatically place error messages inside the control for us), there is some new code. First, you’ll notice we now have a drop down control for the user to select the employee’s manager. During the Page_Load method we will call another method to populate the drop down with a list of employees in the database. While this behavior seems unrelated to validation, it is another good example of the data binding capability of web form controls, and offers an example of how we can help the user avoid validation errors by forcing a selection from a list of good values. The method to bind the data to the drop down list is shown below.
private void BindReportToDropDown()
{
    SqlCommand sqlCommand = new SqlCommand();
    sqlCommand.CommandText =
               "SELECT EmployeeId, " +
                     "Firstname + ' ' + Lastname As Name " +
               "FROM Employees";

    sqlConnection1.Open();
    sqlCommand.Connection = sqlConnection1;
    SqlDataReader sqlDataReader = sqlCommand.ExecuteReader();

    ReportsToDropDownList.DataSource = sqlDataReader;
    ReportsToDropDownList.DataTextField = "Name";
    ReportsToDropDownList.DataValueField = "EmployeeId";
    ReportsToDropDownList.DataBind();

    sqlDataReader.Close();
    sqlConnection1.Close();
}
Notice we can set a display field (DataTextField) and a value field (DataValueField). This distinction becomes useful when we examine the new code to insert an employee record into the database. The code will need to extract the EmployeeId of the selected manager to generate the correct insert statement, and this technique allows us to easily pull the EmployeeId using the value field of the selected item. The following code shows the event handler invoked when the user clicks the Submit button on the form.
private void SubmitButton_Click(object sender, System.EventArgs e)
{
    if(Page.IsValid)
    {
        SqlCommand sqlCommand  = new SqlCommand();
        sqlCommand.CommandText =
            "INSERT INTO Employees( " +
         "FirstName, LastName, HireDate, BirthDate, ReportsTo, “ +
              “PhotoPath) " +
          "VALUES(@FirstName, @LastName, @HireDate, @BirthDate, “ +
              “@ReportsTo, @PhotoURL)";

        sqlCommand.Parameters.Add("@FirstName", FirstNameTextBox.Text);
        sqlCommand.Parameters.Add("@LastName", LastNameTextBox.Text);
        sqlCommand.Parameters.Add("@HireDate", HireDateTextBox.Text);
        sqlCommand.Parameters.Add("@BirthDate", BirthDateTextBox.Text);
        sqlCommand.Parameters.Add("@ReportsTo",
                           ReportsToDropDownList.SelectedItem.Value);
        sqlCommand.Parameters.Add("@PhotoURL", PhotoURLTextBox.Text);

        sqlConnection1.Open();
        sqlCommand.Connection = sqlConnection1;
        sqlCommand.ExecuteNonQuery();
        sqlConnection1.Close();

        ClearFields();
    }
}
If we launch the form and click Submit without entering any values, we should see the following display. All of the validation errors appear in the validation summary, but unfortunately there is no indication of which fields have produced the errors. This will place the burden on the user to find the input controls with the invalid values. In the next section we will try to improve the error feedback.

Using In-Line and Summary Errors
All validation controls have an additional property named Text. When there is no ValidationSummary control present on a Form, the runtime will use the Text property to display an error message on the form. However, when a ValidationSummary control is present, the ErrorMessage text displays in the ValidationSummary area while the Text property still displays in-line where the validation control exists on the form. We can use this behavior to draw attention to the input controls failing validation.
To demonstrate this behavior we need to switch all of the validation controls Display properties back to a Static or Dynamic display, and set the Text property of each control to display an asterisk (*). The design view for the form now looks like the following screen capture.
Summary
Providing feedback to data entry errors is an important feature. Web applications are a special case, because validation happens on the client and the server. The validation controls in ASP.NET allow you to perform these validations and customize the logic for special cases.
by Scott Allen


 Subscribe
 Twitter
 Search
 About
About
 Learn C#