
Something else we touched on in “Being a Better Developer” are the benefits of deliberate practice.
Over the years I’ve developed a habit I’d consider deliberate practice, and that’s the habit of writing unit tests when learning a new language, framework, or library. I’m not testing for quality, but trying to internalize what I’m learning about a new topic by writing code and experimenting.
Learning becomes a combination of reading documentation, reading source code (sometimes via a decompiler), and practicing code by writing code in tests.
For example, here are some of the tests I’ve written again the new Immutable Collections:
[Fact]
public void Modification_Returns_A_New_List()
{
    var list1 = ImmutableList.Create<int>(1);
    var list2 = list1.Add(2);

    Assert.False(Object.ReferenceEquals(list1, list2));
}

[Fact]
public void Create_Always_Returns_Same_Empty_List()
{
    var list1 = ImmutableList.Create<int>();
    var list2 = ImmutableList.Create<int>();

    Assert.True(Object.ReferenceEquals(list1, list2));
}

[Fact]
public void Clear_Returns_Same_Empty_List_As_Create()
{
    var list1 = ImmutableList.Create<int>(1,2,3);
    var list2 = ImmutableList.Create<int>();

    list1 = list1.Clear();

    Assert.True(Object.ReferenceEquals(list1, list2));
}
Writing simple tests like these give me confidence in using a new technology.
Iris and I put together “Being a Better Programmer” with tips and strategies for everything from writing code to time management. We’ll list our favorite books and tell you a bit about how we got started in the industry, as well as talk about how we learn the business domain and where to go to find some good code to read.

One of the techniques we talk about for being a better programmer is writing code – lots of code. Sometimes the code is a hobby project you work on for personal fun, sometimes the code is a kata or a koan, and sometimes the code is something you deliberately implement to see how something works in isolation. I have many little projects checked into source control that only exist to understand how something works.
For example, the behavior of a List<T>. If you want to figure out the default capacity of a List<T>, as well as the algorithm it uses to increase capacity, then you can use a decompiler or create a small experiment project to test a List<T> under different scenarios. While the decompiler is a useful exercise on its own, a small project with code is something that can give you hours of enjoyment as you run the program under different framework versions and try different parameters.
Here’s one I wrote recently that provides some interesting results.
static void Main(string[] args)
{
    var list = new List<int>();
    var newCapacity = list.Capacity;
    var oldCapacity = newCapacity ^ Int32.MaxValue;

    while (true)
    {
        if (oldCapacity != newCapacity)
        {
            Console.WriteLine(newCapacity);
            oldCapacity = newCapacity;
        }
        list.Add(1);
        newCapacity = list.Capacity;
    }
}
For those who watch, I hope you enjoy the course!
A few weeks ago we looked at a minimalistic Katana based project to serve a static response from a console application. For more fun we can throw in the WebAPI with only a little more work. The first step is adding a package that forms a bridge between the OWIN/Katana host and the WebAPI.
Install-Package Microsoft.AspNet.WebApi.OwinSelfHost -IncludePreRelease
The OwinSelfHost package depends on some of the core WebAPI packages, so one install command will bring in everything we need to get WebAPI up and running.
WebAPI does require some configuration to process requests, and we need to provide a routing rule describing how to map incoming requests to controllers. The configuration is always done using an instance of an HttpConfiguration object. In a traditional ASP.NET hosting scenario we access an existing WebAPI configuration object through GlobalConfiguration.Configuration, but in a self hosting scenario we need to create our own. Let’s create a custom class.
public class MyHttpConfiguration : HttpConfiguration
{
    public MyHttpConfiguration()
    {
        ConfigureRoutes();
        ConfigureJsonSerialization();
    }

    private void ConfigureRoutes()
    {
        Routes.MapHttpRoute(
            name: "DefaultApi",
            routeTemplate: "api/{controller}/{id}",
            defaults: new { id = RouteParameter.Optional }
        );
    }

    private void ConfigureJsonSerialization()
    {
        var jsonSettings = Formatters.JsonFormatter.SerializerSettings;
        jsonSettings.Formatting = Formatting.Indented;
        jsonSettings.ContractResolver = new CamelCasePropertyNamesContractResolver();
    }
}
Back in the Startup class, we no longer need to configure our own async handler to say “Hello, World!”. Instead we’ll add the WebAPI with the UseWebApi extension method provided by WebApi.OwinSelfHost, and an instance of our custom config class.
public class Startup
{
    public void Configuration(IAppBuilder app)
    {
        var config = new MyHttpConfiguration();
        app.UseWebApi(config);
    }
}
The UseWebApi method installs a piece of Katana middleware (topic for a future post) that adapts HTTP request and response messages in the OWIN pipeline to and from the HttpRequestMessage and HttpResponseMessage objects that form the core of the WebAPI abstraction, as well as configuring the environment for the message processing. For example, setting Thread.CurrentPrincipal.
Now all need is a model and a controller.
public class Greeting
{
    public string Text { get; set; }
}

public class MessageController : ApiController
{
    public Greeting Get()
    {
        return new Greeting
        {
            Text = "Hello, World!"
        };
    }
}
Finally, we can run the application and verify that IE11 still uses Notepad to display JSON payloads.

Last week I had an idea for visualizing the flow of patient data through an algorithmic process and tried out d3.js. d3 is short for data-driven documents. If you follow the previous link you’ll find some impressive visualizations made with d3 and SVG (the d3 Show Reel is just one example).
d3 is a bit jQuery-ish in the sense it can manipulate the DOM, select elements, and set attributes. For the work I was doing there are 2 distinguishing features of d3:
- d3 can join elements with data sources. The end result is similar to using a repeater with data binding.
- d3 can use a function to calculate attribute values instead of using hard coded values.
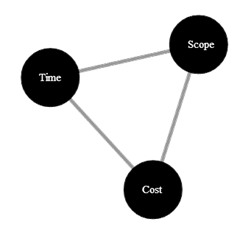
For example, let’s say we have the following data:.
var data =
[
    { name: "Cost" },
    { name: "Scope" },
    { name: "Time" }
];
We’ll combine the data with some d3 code:
d3.selectAll("p")
  .data(data)
  .enter()
  .append("p")
  .text(function(d) { return d.name });
The d3 API takes some work to understand, but the above code reads like this:
 1. Find all paragraph elements in the document.
2. Join the elements with the data array
3. If there is a data element with no paragraph …
4. Then append a new paragraph to the document
5. And set the text of the paragraph to the name attribute of each data item
The result being that three new paragraphs will appear on the page using text from the data array. Of course this example is uninspiring and entirely boring, but also easy to understand.
Another great feature of d3 are the layouts the library supports. The force layout uses verlet integration (one of my favorites) to constrain object positions. Let’s use the same data as earlier, but this time use SVG and a force layout to create the famous iron triangle of project management (but in this case a triangle that no matter how far you pull of the edges, the triangle will always rebalance itself).
First, we’ll need to augment our data with some links. d3 will process the source and target values in data links as array indexes into the data array and know that cost relates to scope, scope relates to time, and time relates to cost.
var data =
  [
    { name: "Cost" },
    { name: "Scope" },
    { name: "Time" }
  ];

var dataLinks =
  [
    { source: 0, target: 1 },
    { source: 1, target: 2 },
    { source: 2, target: 0 }
  ];
The next step is to create the force layout given an area of 960x500, keeping a distance of 220px between nodes, and maintaining a slight negative charge (repulsion) between elements. There is also a “game loop” setup using a tick function to update the screen (we’ll see it later).
var force =
    d3.layout.force()
      .size([960, 500])
      .nodes(data)
      .links(dataLinks)
      .linkDistance(220)
      .charge(-20)
      .on("tick", tick);
The layout is an abstraction in the sense it will set x and y properties on our data and link objects, but it is up to us to make something appear on the screen. So, we’ll use d3 to create an svg element in the document, then a <line> for each link, and a <circle> and <text> for each data element.
var svg = d3.select("body").append("svg")
            .attr("width", 960)
            .attr("height", 500);

var links = svg.selectAll(".link")
               .data(dataLinks)
               .enter().append("line")
               .attr("class", "link");

var nodes = svg.selectAll(".node")
               .data(data)
               .enter().append("circle")
               .attr("class", "node")
               .attr("r", 40)
               .call(force.drag);

var text = svg.selectAll(".text")
              .data(data)
              .enter()
              .append("text").attr("class", "text")
              .text(function (d) { return d.name; });

force.start();
As the force layout applies its logic it will update x and y properties on our data elements and links. Now it is our job to update all the lines, circles, and text elements on each tick loop with their associated values from the data objects. As objects are dragged around the screen, the force layout will continue to update these values.
function tick() {
    links.attr("x1", function (d) { return d.source.x; })
        .attr("y1", function (d) { return d.source.y; })
        .attr("x2", function (d) { return d.target.x; })
        .attr("y2", function (d) { return d.target.y; });

    nodes.attr("cx", function (d) { return d.x; })
        .attr("cy", function (d) { return d.y; });

    text.attr("x", function (d) { return d.x - 15; })
        .attr("y", function (d) { return d.y + 5; })
        .text(function (d) { return d.name; });
}
The end result is the “perfect project manager” who always keeps the iron triangle perfectly balanced.
Try it for yourself at http://jsfiddle.net/By5vH/3/.
Last week Pluralsight published the 2nd course in my Learning to Program series. It is “Learning To Program - Part 2: Abstractions”, and the course focuses on some of the topics I had to unlearn to learn.
 When I started learning to program Basic and assembly languages on a TI-99 4/A, I had no idea what computer programming was about and very few people who I could ask for help. Most of my time was spent trying to understand the syntax of the languages and putting together the right sequence of characters to make something work. I never gave a thought to algorithms, design, or code aesthetics, as the primary motivator was to color pixels on the screen and play musical notes.
I do remember being stumped trying to generate a random number using assembly language instructions. How do you get a giant calculator to produce an accidental value? This question led to hours of metaphysical thinking by a teenage boy. The whole idea of randomness with electronics never did click for me till Douglas Adams wrote about putting an atomic vector plotter inside a Brownian Motion producer.
University mostly reinforced the idea that computer programming was all about technical knowledge. So did every job interview I ever had.
It’s easy to be a software developer and not see the forest for the trees. It took me a long time to change my focus.
In this course I wanted to give students a different perspective on programming than the one I started with by deemphasizing low level technical details and language syntax as much as possible. Instead I wanted to emphasize how to think about software decomposition and composition from the start, so a student would have some idea about the forest they live in. That’s one reason I chose Python as the programming language for this course.

Python is a beautiful, clutter free language that runs nearly everywhere. You can focus on design after learning just a few keywords and symbols. Python is also easy to work with. The REPL can provide instant feedback on both the syntax and the behavior of code.
In the course I cover everything from how to use the REPL to the different data structures available with Python. I also show how to break a program into functions and how to use a class definitions to create objects.
I talk about object oriented programming but I never talk about inheritance and polymorphism. Instead, I talk about building abstractions. Functions are abstractions, and objects are abstractions, too. When I was a student I would think that a hash table would be a perfectly reasonable abstraction for a shopping cart. I want today’s students to know the hash table can be an implementation detail and something you can encapsulate into a better abstraction for a shopping cart.
This course is about the single responsibility principle and the mantra of “design for use, not reuse”, although those words are never spoken verbatim. Knowing Big-O notation and how to work with pointers is incredibly important to build software correctly. But, I think those concepts receive too much of the spotlight in programming introductions, leaving many to believe, like I did, that you should solve every problem using lists of strings and numbers.
I hope everyone who watches enjoys the course and starts off with a better perspective on how to build software.
 Angular will broadcast a $destroy event just before tearing down a scope and removing the scope from its parent.
Listening for this event is crucial for cleaning up tasks and resources that otherwise might continue to chew up memory or CPU.
As an example, the following controller continuously updates a model value in one second intervals, and these updates will continue forever, even after the controller’s view is gone and the scope is removed from its parent. Even worse, if the user is navigating back and forth to a view that loads this controller, each navigation will add another timer that runs forever.
module.controller("TestController", function($scope, $timeout) {

    var onTimeout = function() {
        $scope.value += 1;
        $timeout(onTimeout, 1000);
    };
    $timeout(onTimeout, 1000);
    $scope.value = 0;

});
Listening for the $destroy event is an opportunity to halt the timer. One approach is to cancel the promise returned by $timeout.
module.controller("TestController", function($scope, $timeout) {

    var onTimeout = function() {
        $scope.value += 1;
        timer = $timeout(onTimeout, 1000);
    };
    var timer = $timeout(onTimeout, 1000);

    $scope.value = 0;

    $scope.$on("$destroy", function() {
        if (timer) {
            $timeout.cancel(timer);
        }
    });
});
The Workspace feature of Chrome’s Developer Tools allows you to live edit the source code to a web application and have your changes saved on your local file system. The Workspace feature is now available not yet available in the stable builds of Chrome, but sounds like it will be soon.
The first step is to open the Settings panel by clicking the “gears” icon in the lower right of the tools window. Then select “Workspace”. Under “Folders” you can select one or more folder where your source lives, or even a parent folder like your parent folder for all git repositories. The Workspace features is fairly smart when it comes to finding source code files inside.
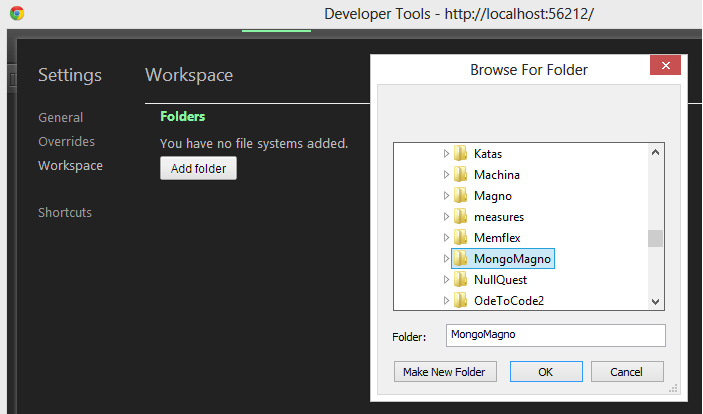
Theoretically you could select the root directory of a drive, but I’m not clear on the implications of granting access, and after selecting a folder you’ll have to say yes to a popup warning about making sure you “do not expose sensitive information”. Until there is a definitive document (I couldn’t find one), I’d have to assume third party extensions would be able to poke around the file system looking for plaintext passwords inside of config files.
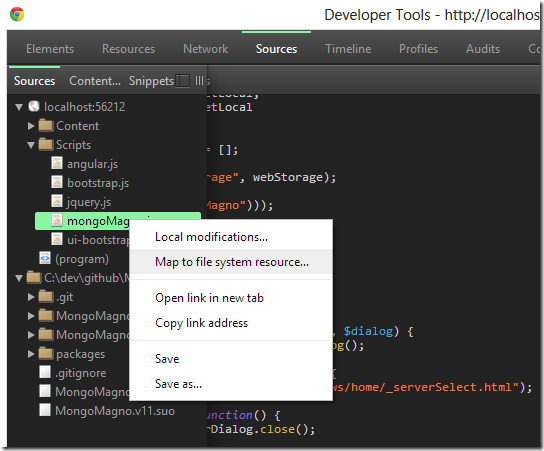
Once a file system location is mounted, you can start to edit files in the Sources tab of the developer tools. You can open and edit any text file from the file system tree in the Navigator window of the Sources panel, even non web files like build files or C# code.
Of course the files you will be most interested in editing are the JavaScript and CSS files that are loaded into the browser from a web application. You can “map” a file loaded into the browser to a file on the file system by right-clicking the file in the Navigator window and selecting the matching file on your hard drive.
Once that step is complete, you can now start editing the JavaScript and CSS of an application and have the changes saved (Ctrl+S) to your local file system.
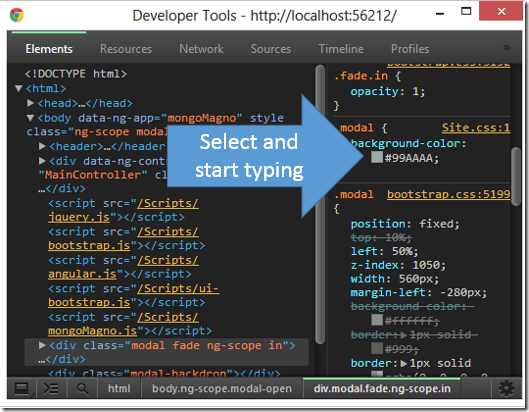
For editing the CSS of an application, the Workspaces experience is unsurpassed by any other development environment. You get to see your live site running in the browser with live data. The changes you make in the CSS are instantly reflected in the browser, and when the UI looks good, pressing Ctrl+S will save your changes into your CSS file. You can edit the CSS file directly, but you can also edit CSS from the Elements pane for fine-tuning, and these changes are immediately persisted. It is the ultimate WYSIWYG designer.
You can edit other files, too, like JavaScript files, but these generally require a refresh of the browser to see the changes running. For example, you can open up a file of Jasmine tests and create a new test, but running the test requires a refresh. It would be nice to have an option of automatic re-execution in the spirit of today’s automated test runners.
Obviously a change to compiled code, like a C# file, requires a re-build outside of the browser and dev tools. It would be nice to have some hooks to do this automatically like some text editors can do.
As for the Chrome Dev Tools becoming an everyday all day editor + IDE, it still has a ways to go. The tools have always behaved like a gifted but insubordinate child. Hitting backspace or enter at the wrong time can wipe out a style definition (fortunately Ctrl+Z undo can bring the style back), and the UI often feels cramped, jumbled (even on a big screen), and quirky (as I’m typing, an unlabeled checkbox has appeared in the middle of nowhere). The tools also feel transient, since closing the wrong browser tab will close the associated workspace, and the editing ability is still missing some key features provided by other editors, like columnar selection, auto-completion for CSS properties, and commands or triggers to interact with external tools.
Despite these shortcomings, the Chrome dev tools are still head and shoulders above the tools in other browsers. Plus, they get better with every frequent release.

 OdeToCode by K. Scott Allen
 Subscribe
 Twitter
 Search
 About
About
 Learn C#