
 If you enjoyed this article, you'll enjoy the book even more! Order now from Packt Publishing and save 10%!
The workflow designer hosted in Visual Studio 2005 makes workflow design a drag and drop operation. Before we drag and drop our way to solutions, it’s worthwhile to take a detailed look at how to write a workflow definition and transform the definition into executable code. Windows Workflow is flexible. We can author workflows using a purely declarative style (XAML), a purely imperative style (C# or VB.NET code), or a combination of XAML and code. We will examine each of these options, and discuss the pros and cons of each.
Creating Object Graphs
A workflow ultimately becomes a group of managed objects in memory. The trick is to arrange the objects in a relationship so they can perform useful work. This trick isn’t specific to workflow software. Consider some code from a Windows application.
this.button1.Location = new System.Drawing.Point(13, 13);
this.button1.Name = "button1";
this.button1.Size = new System.Drawing.Size(75, 23);
this.button1.TabIndex = 0;
this.button1.Text = "Click Me!";
this.button1.UseVisualStyleBackColor = true;
this.Controls.Add(this.button1);
We are creating a Button object and setting some properties so the button will appear visually appealing. This code lives inside a class derived from System.Windows.Forms.Form. The most important line of code is adding the button object to the form’s Controls collection: this.Controls.Add(this.button1). If we never established a relationship between the Form object and the Button object, the button would never appear on the form.
We generally don’t write code like this ourselves, but we rely on a designer to generate the code. The designer generated code has two goals. The first goal is to instantiate objects and set their properties to an initial value. The second goal is to establish relationships between the new objects and construct an object graph.
The ASP.NET designer generated code for a web form has the same goals, but looks a bit different.
<asp:Button runat="server" ID="button1" Text="Click Me!" />
</asp:Panel>
The ASP.NET designer produces declarative mark-up instead of imperative code. Arguably, the primary reason for using declarative mark-up is the ability to intertwine .NET objects with HTML, and HTML is already a declarative language. However, using a declarative style increases readability of the generated code. At a glance, we can see the Button object is a child of the Panel object.
Both Windows Presentation Foundation and Windows Workflow use the eXtensible Application Markup Language (XAML), which takes the declarative style even further.
<Button Grid.Row="0" Grid.Column="0">
Click Me!
</Button>
</Grid>
XAML has the advantage of being valid XML. We are now looking at a declarative style that is human readable (it’s easy to see the Button nested inside of a Grid control), and tool-able. Tool-able meaning we don’t have to rely on custom designers and compilers to read, write, modify, and parse the mark-up. We could write a custom tool for special tasks using the wide variety of XML technologies available, like XPath, XQuery, XSLT, and the XML DOM.
In the next section, we will look at using a purely declarative approach to building workflows using XAML.
Pure XAML
Here is the start of a workflow defined using only XAML.
xmlns="http://schemas.microsoft.com/winfx/2006/xaml/workflow"
xmlns:x="http://schemas.microsoft.com/winfx/2006/xaml"
>
<WhileActivity>
<CodeActivity />
</WhileActivity>
</SequentialWorkflowActivity>
The root element is a SequentialWorkflowActivity. WF provides the SequentialWorkflowActivity and StateMachineWorkflowActivity classes primarily to serve as root level activities. These classes manage the execution of their children using different styles. The SequentialWorkflowActivity serially executes its children until the last activity completes. The order of activities is important, as the order will determine when the activity executes.
We can see our workflow consists of a WhileActivity with a CodeActivity inside. The XAML is an XML representation of the object graph we want to create. The XAML sets up a code to execute inside of a loop. We’ve yet to define the code, or the while condition, so the workflow will not pass validation as yet.
We talk about an XML element like <WhileActivity> as if the element was a class, because it is. XAML works by mapping XML to .NET types. Elements map to classes, and attributes map to properties on those classes. Each XML namespace in XAML corresponds to one or more .NET namespaces.
Namespaces in XML are similar to namespaces in .NET. Both help to avoid name collisions when different entities have the same name. Our XAML file brings two namespaces into scope with the xmlns attribute. The workflow namespace is the first and default namespace in our XAML, and maps to the CLR namespace System.Workflow.Activities . The workflow namespace is the default namespace because there is no prefix for the namespace. The second namespace is the XAML namespace, which uses an x: prefix.
The XAML namespace is special because it gives the workflow compiler instructions. For instance, the x:Class attribute tells the workflow compiler the name of a new Type to create from the workflow definition. When we run the XAML through the compiler, the result will be an assembly with a class inside by the name of MyWorkflow .
For now, let’s forget about the WhileActivity and concentrate on putting together valid XAML to compile.
xmlns="http://schemas.microsoft.com/winfx/2006/xaml/workflow"
xmlns:x="http://schemas.microsoft.com/winfx/2006/xaml"
x:Class="MyWorkflow"
>
<CodeActivity ExecuteCode="SayHello" />
<x:Code>
<![CDATA[
private void SayHello(object sender, EventArgs e)
{
Console.WriteLine("Hello, workflow!");
}
]]>
</x:Code>
</SequentialWorkflowActivity>
We now have a valid workflow because the CodeActivity has an event handler defined for the ExecuteCode event. Our use of the CodeActivity is atypical. A CodeActivity would usually inspect and change the workflow state using some calculations and logic. We are just writing a message to the console. This example demonstrates how to use in-line code with XAML. The use of in-line code is also atypical, as many developers like to work with proper classes and consider in-line code one of the seven deadly sins. We can put the code into a class and implement the same feature using a custom activity.
Using Custom Activities in XAML
A custom activity inherits from System.Workflow.ComponentModel.Activity and allows us to build workflows using components tailored to our problem domain. To implement the custom activity we need to override the virtual Execute method. The following code is a custom activity that can write a message to the console.
{
protected override ActivityExecutionStatus Execute
(ActivityExecutionContext executionContext)
{
Console.WriteLine(_message);
return ActivityExecutionStatus.Closed;
}
private string _message;
public string Message
{
get { return _message; }
set { _message = value; }
}
}
We’ve also created a public Message property for our custom activity. We can set a value for this property in XAML using a Message attribute. Our pure XAML solution doesn’t need in-line code anymore, and now looks like the following.
xmlns="http://schemas.microsoft.com/winfx/2006/xaml/workflow"
xmlns:x="http://schemas.microsoft.com/winfx/2006/xaml"
xmlns:otc="http://schemas.OdeToCode.com/WinWF/Activities"
x:Class="MyWorkflow"
>
<otc:WriteLineActivity Message="Hello, workflow!"/>
</SequentialWorkflowActivity>
How will the workflow compiler know to look in the OdeToCode.WinWF.Activities namespace for the WriteLineActivity? The answer lies in a piece of assembly level metadata we include in the assembly where the WriteLineActivity lives.
"http://schemas.OdeToCode.com/WinWF/Activities",
"OdeToCode.WinWF.Activities")
]
The compiler will look in referenced assemblies for XmlnsDefinitionAttribute attributes. When it finds the above definition, the compiler will know to map "http://schemas.odetocode.com/WinWF/Activities" to the CLR namespace OdeToCode.WinWF.Activities in the assembly where the attribute resides.
An alternative approach to namespace mapping is to embed the CLR namespace and assembly name directly in the XAML. This approach would look like the following: xmlns:otc="clr-namespace:OdeToCode.WinWF.Activities;assembly=hostname"
Our workflow is almost ready to execute, but first we will need to transform the XAML into instructions for the CLR.
Compiling Workflows
Windows Workflow provides two compilers for us to use. The first compiler is the class WorkflowCompiler in the System.Workflow.ComponentModel.Compiler namespace. The second compiler is a command line compiler – essentially a console-mode application wrapper around the WorkflowCompiler class.
The workflow compiler follows a number of steps when it transforms a workflow definition into a Type. The first step is to validate every activity in the workflow definition. An activity can define its own validation logic. For example, the CodeActivity will raise a validation error if its ExecuteCode event handler is empty. After validation, the compiler will generate code (the default language is C#) into a temporary directory. The generated source code then serves as input to the C# or Visual Basic.NET compilers for compilation into an assembly.
Compiling With Wfc.exe
The WF command line compiler goes by the name of wfc.exe – the Windows Workflow Compiler. The first parameter we will pass is the name of our XOML file (the extension for a file containing workflow mark-up is .xoml). Our filename in this example is purexaml3.xoml. We will also pass the name of the assembly to produce (purexaml3.dll) as the out parameter, and reference the assembly containing our custom WriteLineActivity class (chapter2_Host.exe).
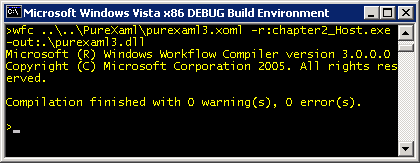
Voila! We now have an assembly we can use in a host application. We can dynamically load the assembly using a call to Type.GetType and passing an assembly-qualified type name. An assembly-qualified type name includes the name of the type, and the name of the assembly where the type lives. The type name for our new workflow is “MyWorkflow”. This is the name we assigned using the x:Class attribute in the XOML file. The assembly-qualified name will be “MyWorkflow, purexaml3”. The following code instantiates and executes the workflow.
using (AutoResetEvent waitHandle = new AutoResetEvent(false))
{
runtime.WorkflowCompleted += delegate { waitHandle.Set(); };
runtime.WorkflowTerminated += delegate { waitHandle.Set(); };
Type workflowType = Type.GetType("MyWorkflow, purexaml3");
WorkflowInstance instance = runtime.CreateWorkflow(workflowType);
instance.Start();
waitHandle.WaitOne();
}
Remember the workflow executes asynchronously on a thread from the CLR thread pool. We will wait for the workflow to finish by waiting for a signal from an AutoResetEvent.
Compiling With WorkflowCompiler
We can use the WorkflowCompiler and WorkflowCompilerResults classes to programmatically compile workflow definitions and retrieve a new assembly. Wfc.exe uses the WorkflowCompiler class internally to perform a compilation.

To use the WorkflowCompiler class we need to set up a WorkflowCompilerParameters object. We need to use the parameters object to reference the assembly containing our custom activity.
WorkflowCompilerParameters parameters;
parameters = new WorkflowCompilerParameters();
parameters.GenerateInMemory = true;
parameters.ReferencedAssemblies.Add("chapter2_Host.exe");
string[] xomlFiles = { @"..\..\purexaml\purexaml3.xoml" };
WorkflowCompilerResults compilerResults;
compilerResults = compiler.Compile(parameters, xomlFiles);
Notice the Compile method accepts an array of string objects, so we can pass multiple XOML files at once. If the compilation was not successful, the Errors property of the result will contain details on what went wrong.
{
foreach (CompilerError error in compilerResults.Errors)
{
Console.WriteLine(error.ErrorText);
}
}
Running the workflow compiled by the WorkflowCompiler only requires a slight adjustment to our previous code. Instead of using Type.GetType we will go directly to the new assembly and ask for the workflow type.
using (AutoResetEvent waitHandle = new AutoResetEvent(false))
{
runtime.WorkflowCompleted += delegate { waitHandle.Set(); };
runtime.WorkflowTerminated += delegate { waitHandle.Set(); };
Type workflowType;
workflowType = compilerResults.CompiledAssembly.GetType("MyWorkflow");
WorkflowInstance instance = runtime.CreateWorkflow(workflowType);
instance.Start();
waitHandle.WaitOne();
}
Two interesting implementation details are worthy of mention at this point. First, the WorkflowCompiler creates a new application domain on each call to Compile . Be wary of the overhead when designing applications that may invoke Compile multiple times during their lifetime. Secondly, the Compile method will automatically load the new assembly into the current AppDomain if the GenerateInMemory parameter flag is set to true and the compilation is successful. If you don’t want the assembly loaded immediately, make sure to set GenerateInMemory to false.
We’ll be looking at workflow activation later, which is a lightweight alternative to compilation. For now, we have one more compilation environment to examine.
Compilation with MSBuild
MSBuild is the XML based build engine included with the .NET 2.0 runtime. All of the .csproj and .vbproj project files used by Visual Studio are also MSBuild files. When we ask Visual Studio to build a project, the IDE uses a hosted instance of MSBuild to perform the build. We can also use MSBuild directly from the command line and pass command line options.
We are going to build our custom activity and workflow into the same assembly using MSBuild. We can use the same XOML file as the last example, and create an MSBuild project file.
DefaultTargets="Build"
xmlns="http://schemas.microsoft.com/developer/msbuild/2003">
<PropertyGroup>
<OutputType>library</OutputType>
<AssemblyName>purexaml3</AssemblyName>
</PropertyGroup>
<ItemGroup>
<Reference Include="System" />
<Reference Include="System.Workflow.Activities" />
<Reference Include="System.Workflow.ComponentModel" />
<Reference Include="System.Workflow.Runtime" />
</ItemGroup>
<ItemGroup>
<Compile Include="..\CustomActivity\WriteLineActivity.cs"/>
</ItemGroup>
<ItemGroup>
<Content Include="purexaml3.xoml"/>
</ItemGroup>
<Import
Project="$(MSBuildBinPath)\Microsoft.CSharp.targets" />
<Import
Project="$(MSBuildExtensionsPath)\Microsoft\Windows Workflow Foundation\v3.0\Workflow.Targets" />
</Project>
Our MSBuild file consists of properties, items, and targets. Properties configure the build by setting the output type and assembly name. Items represent the inputs to the build engine, like source code files and assembly references. We’ve included our XOML file as well as the C# source code file for the WriteLineActivity. Finally, we import targets for C# and workflow compilation. These targets will execute the necessary tasks to compile the code and workflow. When we create a new workflow project in Visual Studio, the project template automatically sets up the project file to import the workflow targets and reference the workflow assemblies.
To see the XML behind a project file, right-click a project file in Visual Studio and select “Unload Project” from the context menu. Right-click the project again and select the edit option. The typical workflow project will contain more XML than the bare minimum we’ve defined above, but you’ll notice all projects created by the workflow templates will have references to the workflow assemblies, and an import of the workflow target definitions.
At this point, all we need to do is execute MSBuild and pass the name of our new project file.

Notice the XOML compilation phase generates C# code into a temporary directory, similar to how ASP.NET compiles web forms. MSBuild feeds the temporary source code and the project source code to the C# compiler. This is an important step to remember, because our code compiles at the same time as the workflow code. We will see later how this approach will let us extend the workflow type with our code.
In a Visual Basic.NET project, the code generated from the XOML compilation is Visual Basic.NET code. Visual Basic.NET workflow projects import a different targets file: Workflow.VisualBasic.Targets.
XAML Activation
In some scenarios, compilation can become a burden. Imagine a database containing a thousand or more workflow definitions tailored and updated for specific users. In this scenario, we might want to avoid the churn of creating new assemblies. What we want to do is load and execute a workflow with the least amount of overhead. Fortunately, this is an area where a pure XAML approach excels, thanks to a feature known as XAML activation.
Before we can activate our workflow, we have to tweak the XOML file. Remember we used an x:Class attribute to tell the compiler the name of the Type to create from the workflow definition. Since we will not be putting the XAML through a compilation phase, there is no compiler available to create a new class. We need to remove the x:Class attribute, which means we can remove the entire XAML namespace declaration.
xmlns="http://schemas.microsoft.com/winfx/2006/xaml/workflow"
xmlns:otc="http://schemas.OdeToCode.com/WinWF/Activities"
>
<otc:WriteLineActivity Message="Hello, workflow!"/>
</SequentialWorkflowActivity>
Activation is only available for workflows defined entirely in workflow mark-up. Since there is no compiler involved, we will need to give up features provide by the XAML namespace (including the ability to define in-line code). Activation merely creates an object graph directly from the XAML representation. XAML is effectively an XML serialization format for CLR objects.
Activation takes place with the same CreateWorkflow method of the WorkflowRuntime class that we’ve used earlier. However, we need to use a different overload of the method. Instead of passing a Type object, we need to pass an XmlReader to steam our workflow mark-up into the runtime.
using (AutoResetEvent waitHandle = new AutoResetEvent(false))
{
runtime.WorkflowCompleted += delegate { waitHandle.Set(); };
runtime.WorkflowTerminated += delegate { waitHandle.Set(); };
TypeProvider typeProvider = new TypeProvider(runtime);
typeProvider.AddAssembly(Assembly.GetExecutingAssembly());
runtime.AddService(typeProvider);
XmlReader reader = XmlReader.Create(@"..\..\purexaml\purexaml5.xoml");
WorkflowInstance instance = runtime.CreateWorkflow(reader);
instance.Start();
waitHandle.WaitOne();
}
When we were compiling XOML files, we could specify an assembly reference to the assembly containing our custom WriteLineActivity . When activating a workflow, the runtime will still need to locate the custom activity assembly, but this time we need to use a TypeProvider service. A TypeProvider holds references to assemblies needed for workflow activation. The runtime will rely on the TypeProvider service to resolve types and assemblies.
One impact to consider before using activated workflows revolves around versioning. When we compile a workflow, we can provide an assembly version and other meta-data to identify the assembly. We can even provide a strong name to uniquely identify the assembly and prevent tampering. XOML files, on the hand, have no versioning infrastructure built in, so if we need versioning or cryptographic signing we’ll have to write some custom code.
We’ve covered the options available to build pure XAML solutions, so it’s time to try a different approach.
Pure Code
The workflow compiler takes a XAML workflow definition and turns the definition into a class. Inside the class are all the instructions needed to create activities, set properties, and establish the relationships between activities. There is not much magic happening behind the scenes, in fact, we could write the class ourselves.
{
public MyWorkflow()
{
WriteLineActivity activity;
activity = new WriteLineActivity();
activity.Message = "Hello, Workflow";
this.Activities.Add(activity);
}
}
Of course, the code would look different if we had dozens of activities with some activities nested inside of other activities. The code would look a great deal more complicated, and the relationships would be difficult to see compared to the XAML version.
Our class has an Activities property it inherits from the CompositeActivity class. This property exposes all the direct children of an activity by returning an ActivityCollection object. Adding a new WriteLineActivity to the collection sets up the custom activity as a child activity for the class to execute.
The code to execute the workflow doesn’t look different than before. The runtime doesn’t care if the class was generated by the workflow compiler, or lovingly crafted using our own fingers.
using (AutoResetEvent waitHandle = new AutoResetEvent(false))
{
runtime.WorkflowCompleted += delegate { waitHandle.Set(); };
runtime.WorkflowTerminated += delegate { waitHandle.Set(); };
Type t = typeof(PureCode.MyWorkflow);
WorkflowInstance instance = runtime.CreateWorkflow(t);
instance = runtime.CreateWorkflow(t);
instance.Start();
waitHandle.WaitOne();
}
In addition to writing our code from scratch, we can have the workflow compiler generate code for us.
Code Generation and XAML Serialization
We mentioned earlier that the workflow compiler generates source code from XAML as part of the compilation process. When using MSBuild, the destination for the source code is a temporary directory, but we can ask the command line compiler to generate a permanent file using the parameter /t:codegen. Let’s go back to one of our first XAML examples and ask the workflow compiler to generate code from the mark-up instead of creating an assembly. C# is the default language the compiler will use. Visual Basic is also available as an option (/language:vb).

The generated source code looks like the source code below (except some extraneous namespaces and compiler directives were removed).
{
private WriteLineActivity writeLineActivity1;
public MyWorkflow()
{
this.InitializeComponent();
}
private void InitializeComponent()
{
this.CanModifyActivities = true;
this.writeLineActivity1 = new WriteLineActivity();
this.writeLineActivity1.Message = "Hello, workflow!";
this.writeLineActivity1.Name = "writeLineActivity1";
this.Activities.Add(this.writeLineActivity1);
this.Name = "MyWorkflow";
this.CanModifyActivities = false;
}
}
The obvious difference between the generated code and the code we wrote by hand is the addition of an InitializeComponent method. However, the InitializeComponent method performs the same essential work as the constructor we wrote earlier – it creates a WriteLineActivity and adds the activity to the Activities collection. A subtler difference is the appearance of the partial keyword on the class definition. The partial keyword allows a class definition to span multiple source code files, and allows us to augment the compiler-generated code with our own code. We will revisit the implications of the partial class definition soon.
Not only can we generate source code from XAML, we can generate XAML from a workflow instance. Remember XAML is essentially an XML serialization format for managed objects. We can walk up to a workflow object with a WorkflowMarkupSerializer and produce mark-up. The following code will display the mark-up for an instance of the code-generated class.
using (WorkflowRuntime runtime = new WorkflowRuntime())
using (StringWriter buffer = new StringWriter())
using (XmlWriter writer = XmlWriter.Create(buffer))
{
TypeProvider typeProvider = new TypeProvider(runtime);
typeProvider.AddAssembly(Assembly.GetExecutingAssembly());
runtime.AddService(typeProvider);
XmlReader reader = XmlReader.Create(@"..\..\purexaml\purexaml5.xoml");
WorkflowInstance instance = runtime.CreateWorkflow(reader);
serializer.Serialize(writer, instance.GetWorkflowDefinition());
Console.WriteLine(buffer.ToString());
}
The WorkflowMarkupSerializer produces the following XAML.
<ns0:MyWorkflow
x:Name="MyWorkflow"
xmlns:x="http://schemas.microsoft.com/winfx/2006/xaml"
xmlns:ns0="clr-namespace:ReSerialize;Assembly=chapter2_Host"
/>
The workflow definition is now opaque. When the workflow compiler creates a new type from a workflow definition, the definition becomes fixed and we cannot see the activities inside with serialization. We can still create an instance of the above workflow using XAML activation, which we covered earlier. The instance will work just like our other examples and execute a WriteLineActivity, thanks to the code the compiler generated for the MyWorkflow class. XAML activation walks the XML and creates objects from the mark-up instructions. When activation instantiates MyWorkflow , the InitializeComponent method will create all the activities for the workflow, so the serialization does not need to explicitly list the child activities with XAML.
Pure Code & Visual Studio
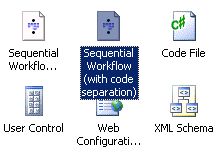
The Windows Workflow SDK installs item templates for Visual Studio. These item templates provide a starting point for building a workflow or an activity. To use a template we merely need to right-click a project and select Add -> New Item. One of the item templates appearing in the Add New Item dialog sets up the files and code needed to support a “pure code” approach. A portion of the item template list appears below.

What the template produces is not a single source code file, however. If we create a new workflow from the Sequential Workflow (code) template, and give the workflow the name of PureCode, the template will add two files to the project: a PureCode.cs file and a PureCode.Designer.cs file. PureCode.cs is a file we can edit, while PureCode.Designer.cs contains code the graphical designer will modify.
We can drop a CodeActivity in the designer and use the Properties window to assign a method for the ExecuteCode event. Select the CodeActivity and click the Generate Handlers hyperlink in the Properties window to generate default code.

These steps will produce the following code inside of PureCode.cs.
{
public PureCode()
{
InitializeComponent();
}
private void codeActivity1_ExecuteCode(object sender, EventArgs e)
{
}
}
PureCode.cs is our file to edit, and the codeActivity1_ExecuteCode method is here and waiting for us to type in an implementation. The constructor calls a method named InitializeComponent , which is nowhere to be found in PureCode.cs, but notice the partial keyword modifier on the class. The InitializeComponent method lives inside the other half of the class definition, which we can find in the designer file (PureCode.Designer.cs). We typically would never need to look at or edit this class, because the workflow designer is responsible for generating code inside the file. Here is what the designer generates for this workflow.
using System.Workflow.Activities;
namespace chapter2_library
{
public sealed partial class PureCode
{
#region Designer generated code
private void InitializeComponent()
{
this.CanModifyActivities = true;
this.codeActivity1 = new System.Workflow.Activities.CodeActivity();
//
// codeActivity1
//
this.codeActivity1.Name = "codeActivity1";
this.codeActivity1.ExecuteCode += new System.EventHandler(this.codeActivity1_ExecuteCode);
//
// PureCode
//
this.Activities.Add(this.codeActivity1);
this.Name = "PureCode";
this.CanModifyActivities = false;
}
#endregion
private CodeActivity codeActivity1;
}
}
The InitializeComponent method appears in this half of the partial class definition and, as usual, contains the code to setup the child activities. The class also includes private fields for each child activity. We can control the names of these fields by setting the Name property of the activity in the designer’s Property window. The C# compiler will merge the two partial class definitions into a single type.
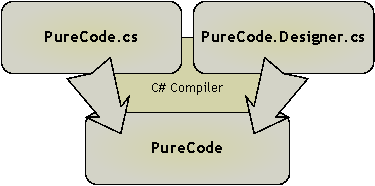
Using the pure code approach with Visual Studio means each workflow is the combination of a designer generated source code file, and a human generated source code file. In this case both of the source code files are the same language.
Code & XAML Together
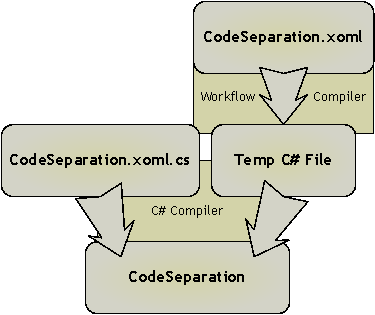
Visual Studio offers a second option for building workflows. The second option uses XAML mark-up and code separation, also commonly referred to as code-beside. In this scenario, the designer stores mark-up inside a XOML file, and we augment the definition with source code in a C# or Visual Basic file. The item template for this option is Sequential Workflow (with code separation).
This item template also adds two files to the project. If we call our workflow CodeSeparation, the files will be CodeSeparation.xoml, and CodeSeparation.xoml.cs. If we build the same workflow as before (with a CodeActivity inside), our CodeSeparation.xoml.cs file will look like the following.
SequentialWorkflowActivity
{
private void codeActivity1_ExecuteCode(object sender, EventArgs e)
{
}
}
Our XOML file, meanwhile, contains the following XAML.
x:Class="chapter2_library.CodeSeparation"
x:Name="CodeSeparation"
xmlns:x="http://schemas.microsoft.com/winfx/2006/xaml"
xmlns="http://schemas.microsoft.com/winfx/2006/xaml/workflow">
<CodeActivity
x:Name="codeActivity1"
ExecuteCode="codeActivity1_ExecuteCode"
/>
</SequentialWorkflowActivity>
The default editor for a XOML file is the graphical workflow designer. If we want to look at the XAML in a XOML file, we can right-click the file and select “Open With”. The Open With dialog will give us a choice of editors, including the XML editor which let’s us see and modify the XAML inside.
Remember the project file for our workflow project will include MSBuild targets, and these targets know how to compile XAML workflow definitions in XOML files. The workflow compiler will first generate C# source code into a file in a temporary directory. The file will contain a class named CodeSeparation and mark with the partial keyword modifier, which allows our partial CodeSeperation class to augment the workflow. The C# compiler picks up the final class definition by using both files.
What we do not get to see in this process is the temporary C# code, but this code will look like the code we generated earlier with the workflow compiler and the /t:codegen parameter. Although we have not used our custom WriteLineActivity in any of the workflows designed with Visual Studio, the Toolbox window will contain the activity and allow us to drop the activity into the workflow. Visual Studio will automatically add any custom activities it finds in the current solution to the Toolbox window.
Summary
We’ve looked at several options available for authoring and building workflows. We’ve built workflows using XOML files and compiled the files both programmatically and from the command line. We also built workflow using pure code, and with code separation. When it comes time to execute a workflow, the result each option is nearly the same. All the options ultimately produce a collection of objects in memory, and the objects maintain parent-child relationships. The workflow runtime manages the execution of the objects.
Code based workflow definitions are perfectly reasonable to use for general-purpose, fixed workflows. When using the workflow designer, chances are we’ll never have to look at the designer generated code, and we don’t particularly care if the designer is using XAML, C#, or Visual Basic code to maintain the workflow definition.
XAML based workflow definitions open up a number of additional possibilities. If we have a workflow definition entirely in XAML we can use workflow activation and avoid compilation. Activation is useful when building a large number of dynamic workflows. We merely need to pass the XML into the workflow runtime to have a run-able instance of a workflow.
Using XAML with code-beside files will keep our workflow definition in an XML file. If we need to write custom tools for our workflows, like a custom workflow designer, than XAML is the preferred approach. XAML is both tool-able, and we can use the wide variety of existing XML APIs to build our tool. XAML, like the CLR, is also language agnostic. The XAML based workflow can work equally well alongside any .NET language. Also, if we want to forego the graphical designer and tweak workflow definitions by hand, the XML format is easier to read and comprehend compared to a code-based definition.
by Scott Allen
Comments? Feedback:? Bring them to my blog.


 Subscribe
 Twitter
 Search
 About
About
 Learn C#