
In part I we talked about the provider model, authentication, and the SqlMembershipProvider class. In this article we turn our attention to the roles and authorization provider.
Once you know a user’s identity, you need to determine what actions you’ll allow the user to perform, and what pages you’ll allow a user to visit. A common technique for managing authorization rules like this is to categorize users into groups, or roles, and make authorization decisions based on the roles assigned to a user. For example, you might have 10,000 registered users for your application but define only 3 roles: administrators, registered users, and anonymous users. Using roles reduces the amount of administrative work required to run a site. When you want to grant or restrict access to all registered users on the site, you only need to apply the rule to one role, and not change the rules for each individual user account.
We typically use roles in our web.config files to allow and deny access for files and folders to groups of users. These rules appear in the <authorization> section of web.config with elements like <allow roles= ”Administgrators”>. It’s easier to use roles that cover broad groups of users compared to listing individual user accounts. You can define these authorization settings in 2.0 using the ASP.NET Web Site Administration Tool.
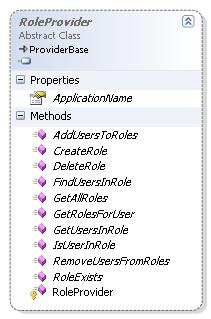
The RoleProvider class is the base class for all role providers. As we discussed in part I, the RoleProvider class defines the contract for all ASP.NET 2.0 role providers. The class includes method to create and delete roles, to add and remove users in a role, and to check the role membership for a given user. This purpose of this class is to define all the functionality you’ll need to perform authorization checks in your application. If none of the role providers included in ASP.NET meet your need (perhaps you store roles in Oracle), you can write your own provider (derived from RoleProvider) and plug your component into ASP.NET.
If you want to programmatically interact with the role provider, use the Roles class from the System.Web.Security namespace. The static Roles class provides methods and properties that will forward calls to the currently configured role provider. For example, Roles.GetAllRoles will call the current role provider’s GetAllRoles method to retrieve an array of strings containing all available role names. If you are making programmatic authorization checks, Roles.IsUserInRole method will be your friend.
Role Providers
Each role provider retrieves and stores role information from a different data source.
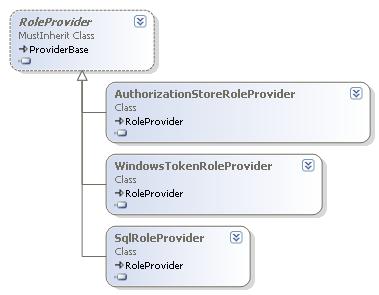
The role providers packaged in System.Web.dll include the SqlRoleProvider, which like the SqlMembershipProvider discussed in part I, stores roles in a SQL Server database.
The WindowsTokenRoleProvider retrieves role information from a user’s group membership in Windows. The WindowsTokenroleProvider is read only (you cannot create new roles, or modify role membership), but is useful in applications using Windows authentication and denying access to anonymous users.
The AuthorizationStoreRoleProvider works with Microsoft Authorization Manager (AzMan). AzMan can use role information stored in XML files or in Active Directory. The AuthorizationStoreRoleProvider can work equally well in Intranet or Internet applications, but can be difficult to use in a partial trust environment.
Configuration
The role manager in ASP.NET is off by default. You can turn on the role manager on the security tab of the web administration tool, which will add the following to the applications’s web.config file.
<system.web>
<roleManager enabled="true" />
</system.web>
You’ll find the default provider configurations in machine.config.
<roleManager>
<providers>
<add name="AspNetSqlRoleProvider"
connectionStringName="LocalSqlServer"
applicationName="/"
type="System.Web.Security.SqlRoleProvider, ..." />
<add name="AspNetWindowsTokenRoleProvider"
applicationName="/"
type="System.Web.Security.WindowsTokenRoleProvider, ..." />
</providers>
</roleManager>
Notice the LocalSqlServer connection string is the default connection string for the SqlRoleProvider. As discussed in part I, LocalSqlServer is a connection string defined in machine.config that points to a SQL Server Express database named aspnetdb in the App_Data directory. If you want the SqlRoleProvider and SqlMembership providers to use a database other than App_Data, you’ll first need to create a database using the aspnet_regsql.exe tool (found in \Windows\Microsoft.NET\Framework\v2.0.xxxx, where xxxx is the last 4 digits of the version number). See part I of this article for more details.
The applicationName property of the SqlRoleProvider is important to configure when using a database outside of App_Data. If you have two web applications and need both applications to share the same roles, give both applications the same applicationName and point them to the same database instance. If you want both applications to use the same database, but not share users, give each application a unique applicationName property. The applicationName property scopes data to a specific web application.
Let’s take a look at a web.config file that configures membership and role providers to use a SQL Server database named aspnetdb on the local server.
<?xml version="1.0"?>
<configuration>
<connectionStrings>
<add name="MyAspNetDB"
connectionString="server=.;database=aspnetdb;integrated security=true"/>
</connectionStrings>
<system.web>
<roleManager enabled="true">
<providers>
<clear/>
<add name="AspNetSqlRoleProvider" connectionStringName="MyAspNetDB"
applicationName="/SampleRolesApp"
type="System.Web.Security.SqlRoleProvider, System.Web, Version=2.0.0.0, Culture=neutral, PublicKeyToken=b03f5f7f11d50a3a" />
</providers>
</roleManager>
<membership>
<providers>
<clear/>
<add name="AspNetSqlMembershipProvider"
connectionStringName="MyAspNetDB"
enablePasswordRetrieval="false"
enablePasswordReset="true"
requiresQuestionAndAnswer="true"
applicationName="/SamplesRolesApp"
requiresUniqueEmail="false"
passwordFormat="Hashed"
maxInvalidPasswordAttempts="5"
minRequiredPasswordLength="7"
minRequiredNonalphanumericCharacters="1"
passwordAttemptWindow="10"
passwordStrengthRegularExpression=""
type="System.Web.Security.SqlMembershipProvider, System.Web, Version=2.0.0.0, Culture=neutral, PublicKeyToken=b03f5f7f11d50a3a" />
</providers>
</membership>
<authentication mode="Forms" />
</system.web>
</configuration>
The first step is defining a connection string for the location of the ASP.NET database. We enable roleManager, and clear out any existing providers whose configuration we inherited from higher level configuration files. The connectionStringName and applicationName properties are carefully set to use the same database and application name as the membership provider configured in this file.
If you want to use the WindowsTokenRoleProvider, there is really no configuration necessary. The provider doesn’t require a database, and can only read role information based on a user’s group membership in Windows. To use the WindowsTokenRoleProvider you only need to add the following to web.config (provider configuration can also take place with the web administration tool, in the providers tab).
<roleManager enabled="true"
defaultProvider="AspNetWindowsTokenRoleProvider"/>
As we mentioned earlier, the AuthorizationStoreRoleProvider uses AzMan. For more information on configuring this provider, see “How To Use Authorization Manager from ASP.NET”, and “How To Use Active Directory Application Mode (ADAM) from ASP.NET”.
Put It Together
Once you have your role provider configured, it’s time to add roles to your application, and put authorization rules in place. We can restrict locations of the web application to specific roles using settings in web.config. For example, putting the following into a web.config file will restrict directory access to users in the Admin role only:
<system.web>
<authorization>
<allow roles="Admin"/>
<deny users="*"/>
</authorization>
</system.web>
You can make granular authorization checks by using IsUserInRole in code.
If Roles.IsUserInRole("Admin") Then
' perform an admin action
Else
' give user an error message
End If
You can also apply the PrincipalPermission attribute to declaratively demand a user to belong to a specific role. You can apply this attribute to a class, or to a method. If the current user is not in one of the specified roles, the code will not execute and the runtime will throw a security exception.
<PrincipalPermission(SecurityAction.Demand, Role:="Registered")> _
Protected Sub DoSomethingImportant()
' ...
End Sub
Conclusions
The extensible provider model in ASP.NET 2.0 implements features we’ve all needed in our applications over the years – like membership and role management. The providers are configurable, and pluggable, meaning you can always write your own when the providers in the box don’t give you what you need.
Questions? Feedback? Bring them here.


 Subscribe
 Twitter
 Search
 About
About
 Learn C#