
7
Creating Custom Modules
Shop at Packt Publishing To Buy This Book Online!
In this chapter, we are going to walk you through creating a custom module for the CoffeeConnections portal. A custom module can consist of one or more custom web controls. The areas we will cover are:
· Creating a private assembly project to build and debug your module
· Creating View and Edit controls
· Adding additional options to the module settings page
· Implementing the IActionable , ISearchable , and IPortable interfaces
· Using the Dual List Control
· Creating a SQLDataProvider
· Packaging your module
· Uploading your module
Coffee Shop Listing Module Overview
One of the main attractions for the CoffeeConnections portal is that users will be able to search, by zip code, for coffee shops in their area. After searching, the users will be presented with the shops in their area. To allow the focus of this chapter to be on module development, we will present a simplified version of this control. We will not spend time on the ASP.NET controls used or validation of these controls, instead we will focus only on what is necessary to create your own custom modules.
Setting Up Your Project (Private Assembly)
The design environment we will be using is Visual Studio .NET 2003. The files used in DotNetNuke come pre-packaged as a VS.NET solution and it is the best way to create custom modules for DotNetNuke. Visual Studio will allow us to create private assemblies (PA ) which will keep our custom module code separate from the DotNetNuke framework code.
A private assembly is an assembly (.dll or .exe ) that will be deployed along with an application to be used in conjunction with that application. In our case, the main application is the DotNetNuke core framework. The private assembly will be a project that is added to the DotNetNuke solution (.sln ). This will keep our module architecture separate from the DotNetNuke core architecture but will allow us to use Visual Studio to debug the module within the framework. Since building our modules in a PA allows us to have separation from the DotNetNuke core framework, upgrading to newer versions of DotNetNuke is a simple process.
Even though the DotNetNuke framework is built using VB.NET, you can create your module private assemblies using any .NET language. Since your module logic will be compiled to a .dll , you can code in the language you like.
The DotNetNuke project is divided into many different solutions enabling you to work on different parts of the project. We have already seen the HTTP Module solution and the Providers solutions. Since we want to look at the default modules that have been packaged with DotNetNuke we will be using the DotNetNuke.DesktopModules solution.
You can even create a new solution and add the DotNetNuke project to the new solution. You would then need to create a build support project to support your modules. We are using the DotNetNuke.DesktopModules solution so that you are able to look at the default modules for help in design process.
To set up your private assembly as part of the DotNetNuke.DesktopModules solution, take the following steps:
1. Open up the DotNetNuke Visual Studio.NET solution file (C:\DotNetNuke\Solutions\DotNetNuke.DesktopModules\DotNetNuke.DesktopModules.sln ).
2. In the Solution Explorer, right-click on the DotNetNuke solution (not the project) and select Add | New Project :
3. In Project Types , make sure that Visual Basic Projects is highlighted and select Class Library as your project type. Our controls are going to run in the DotNetNuke virtual directory, so we do not want to create a web project. This would create an additional virtual directory that we do not need.
4. Your project should reside under the C:\DotNetNuke\DesktopModules folder. Make sure to change the location to this folder.
5. The name of your project should follow the following convention. CompanyName.ModuleName . This will help avoid name conflicts with other module developers. Ours is named EganEnterprises.CoffeeShopListing . You should end up with a new project added to the DotNetNuke solution.
If you have installed URLScan, which is part of Microsoft's IIS Lockdown Tool, you will have problems with folders that contain a period (. ). If this is the case, you can create your project using an underscore instead of a period. Refer to http://www.microsoft.com/technet/security/tools/locktool.mspx for more information on the IIS Lockdown Tool.

6. You need to modify a few properties to allow you to debug our project within the DotNetNuke solution:
· In the Common Properties folder, under the General section remove the Root namespace . Our module will be running under the DotNetNuke namespace, so we do not want this to default to the name of our assembly.
· Delete the Class1.vb file that was created with the project.
· Right-click on our private assembly project and select Properties .
7. In the Common Properties folder, under the Imports subsection , we want to add imports that will help us as we create our custom module. Enter each of the namespaces below into the namespace box and click on Add Import .
· DotNetNuke
· DotNetNuke.Common
· DotNetNuke.Common.Utilities
· DotNetNuke.Data
· DotNetNuke.Entities.Users
· DotNetNuke.Framework
· DotNetNuke.Services.Exceptions
· DotNetNuke.Services.Localization
· DotNetNuke.UI
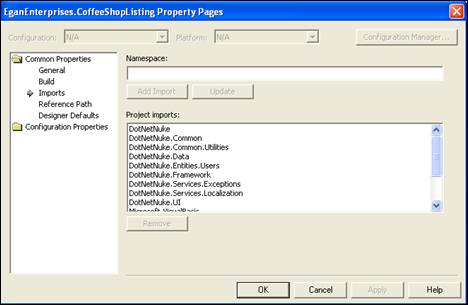
8. Click OK to save your settings
When we run a project as a private assembly in DotNetNuke, the DLL for the module will build into the
DotNetNuke bin
directory. This is
where DotNetNuke will look for
the assembly when it tries to load your module. To accomplish this, there is a
project called BuildSupport
inside each
of the solutions. The BuildSupport
project is
responsible for taking the DLL that is created by your project and adding it to
the DotNetNuke solution's bin
folder.
To allow the BuildSupport project to add our DLL, we need to add a reference to our custom module project.
1. Right-click on the reference folder located below the BuildSupport project and select Add Reference .
2. Select the Projects tab.
3. Double-click on the EganEnterprises.CoffeeShopListing project to place it in the Selected Components box.
4. Click OK to add the reference.
Finally, we want to be able to use all of the objects available to us in DotNetNuke within our private assembly, so we need to add a reference to DotNetNuke in our project.
1.
Right-click on the reference folder located
below the EganEnterprises
.CoffeeShopListing
private assembly project we
just created and select Add Reference
.
2. Select the Projects tab.
3. Double-click on the DotNetNuke project to place it in the Selected Components box.
4. Click OK to add the reference.
Before moving on, we want to make sure that we can build the solution without any errors. We will be doing this at different stages in development to help us pinpoint any mistakes we make along the way.
After building the solution, you should see something similar to the following in your output window.
---------------------- Done ----------------------
Build: 35 succeeded, 0 failed, 0 skipped
The number you have in succeeded may be different but make sure that there is a zero in failed . If there are any errors fix them before moving on.
Creating Controls Manually in Visual Studio
When using a Class Library project as a starting point for your private assembly, you cannot add a Web User Control to your project by selecting Add | New Item from the project menu. Because of this we will have to add our controls manually.
An optional way to create the user controls needed is to create a Web User Control inside the DotNetNuke project and then drag the control to your PA project to make modifications.
Creating the View Control
The View control is what a non-administrator sees when you add the module to your portal. In other words, this is the public interface for your module.
Let's walk through the steps needed to create this control.
1. Making sure that your private assembly project is highlighted, select Add New Item from the Project menu.
2. Select Text File from the list of available templates and change the name to ShopList.ascx .
3. Click Open to create the file.
4. Click on the HTML tab and add the following directive to the top of the page:
<%@ Control language="vb" AutoEventWireup="false"
Inherits="EganEnterprises.CoffeeShopListing.ShopList"
CodeBehind="ShopList.ascx.vb"%>
Directives can be located anywhere within the file, but it is standard practice to place them at the beginning of the file. This directive sets the language to VB.NET and specifies the class and code-behind file that we will inherit from.
5. Click the save icon on the toolbar to save the page.
6.
In the Solution Explorer right-click on the ShopList.ascx
file and select
View
Code
.
This will create a code-behind file for the Web User Control that we just created. The code-behind file follows the format of a normal Web User Control that inherits from System.Web.UserControl . This control, though based on Web.UserControl , will instead inherit from a class in DotNetNuke. Change the code-behind file to look like the code that follows. Here is the code-behind page in its entirety minus the Web Form Designer Generated Code:
Imports DotNetNuke
Imports DotNetNuke.Security.Roles
Namespace EganEnterprises.CoffeeShopListing
Public MustInherit Class ShopList
Inherits Entities.Modules.PortalModuleBase
Implements Entities.Modules.IActionable
Implements Entities.Modules.IPortable
Implements Entities.Modules.ISearchable
Private Sub Page_Load(ByVal sender As System.Object, _
ByVal e As System.EventArgs) Handles MyBase.Load
'Put user code to initialize the page here
End Sub
Public ReadOnly Property ModuleActions() As _
DotNetNuke.Entities.Modules.Actions.ModuleActionCollection _
Implements DotNetNuke.Entities.Modules.IActionable.ModuleActions
Get
Dim Actions As New _
Entities.Modules.Actions.ModuleActionCollection
Actions.Add(GetNextActionID, _
Localization.GetString( _
Entities.Modules.Actions.ModuleActionType.AddContent, _
LocalResourceFile), _
Entities.Modules.Actions.ModuleActionType.AddContent, _
"", _
"", _
EditUrl(), _
False, _
Security.SecurityAccessLevel.Edit, _
True, _
False)
Return Actions
End Get
End Property
Public Function ExportModule(ByVal ModuleID As Integer) _
As String Implements _
DotNetNuke.Entities.Modules.IPortable.ExportModule
' included as a stub only so that the core
'knows this module Implements Entities.Modules.IPortable
End Function
Public Sub ImportModule(ByVal ModuleID As Integer, _
ByVal Content As String, _
ByVal Version As String, _
ByVal UserID As Integer) _
Implements DotNetNuke.Entities.Modules.IPortable.ImportModule
' included as a stub only so that the core
'knows this module Implements Entities.Modules.IPortable
End Sub
Public Function GetSearchItems( _
ByVal ModInfo As DotNetNuke.Entities.Modules.ModuleInfo) _
As DotNetNuke.Services.Search.SearchItemInfoCollection _
Implements DotNetNuke.Entities.Modules.ISearchable.GetSearchItems
' included as a stub only so that the core
'knows this module Implements Entities.Modules.IPortable
End Function
End Class
End Namespace
Let's break up the code listing above so that we can better understand what is happening in this section. The first thing that we do is add an Imports statement for DotNetNuke and DotNetNuke.Security.Roles so that we may access their methods without using the fully qualified names.
Imports DotNetNuke
Imports DotNetNuke.Security.Roles
Namespace EganEnterprises.CoffeeShopListing
Next, we add the
namespace to the class and set it to inherit from Entities.Modules
.PortalModuleBase
. This is
the base class for all module controls in DotNetNuke. Using the base class is
what gives our controls consistency and implements the basic module behavior
like the module menu and header. This class also gives us access to useful
items such as User ID, Portal ID, and Module ID among others.
This section then finishes up by implementing three different interfaces. These interfaces allow us to add enhanced functionality to our module. We will only be implementing the IActionable interface in this file. The others will only be placed in this file to allow the framework to see, using reflection, whether the module implements the interfaces. The actual implementation for the other interfaces occurs in the controller class that we will create later.
Public MustInherit Class ShopList
Inherits Entities.Modules.PortalModuleBase
Implements Entities.Modules.IActionable
Implements Entities.Modules.IPortable
Implements Entities.Modules.ISearchable
Since we will be implementing the IActionable interface in this file, we will now look at the IActionable ModuleActions properties that need to be implemented.
The core framework creates certain menu items automatically. These include the movement, module settings, and so on. You can manually add functionality to the menu by implementing this interface.

To add an action menu item to the module actions menu, we need to create an instance of a ModuleActionCollection . This is done in the ModuleActions property declaration.
Public ReadOnly Property ModuleActions() As _
DotNetNuke.Entities.Modules.Actions.ModuleActionCollection _
Implements DotNetNuke.Entities.Modules.IActionable.ModuleActions
Get
Dim Actions As New _
Entities.Modules.Actions.ModuleActionCollection
We then use the Ad d method of this object to add and item to the menu.
Actions.Add(GetNextActionID, _
Localization.GetString( _
Entities.Modules.Actions.ModuleActionType.AddContent, _
LocalResourceFile), _
Entities.Modules.Actions.ModuleActionType.AddContent, _
"", _
"", _
EditUrl(), _
False, _
Security.SecurityAccessLevel.Edit, _
True, _
False)
Return Actions
End Get
End Property
The parameters of the Actions.Add method are:
|
Parameter |
Type |
Description |
|
ID |
Integer |
The GetNextActionID function (found in the ActionsBase.vb file) will retrieve the next available ID for your ModuleActionCollection . This works like an auto-increment field, adding one to the previous action ID. |
Title |
String |
The title is what is displayed in the context menu form your module. |
|
Parameter |
Type |
Description |
|
CmdName |
String |
If you want your menu item to call client-side code (JavaScript), then this is where you will place the name of the command. This is used for the delete action on the context menu. When the delete item is selected, a message asks you to confirm your choice before executing the command. For the menu items we are adding we will leave this blank. |
|
CmdArg |
String |
This allows you to add additional arguments for the command. |
|
Icon |
String |
This allows you to set a custom icon to appear next to your menu option. |
|
URL |
String |
This is where the browser will be redirected to when your menu item is clicked. You can use a standard URL or use the EditURL function to direct it to another module. The EditURL function finds the module associated with your view module by looking at the key passed in. You will notice that the first example below passes in "Options" and the second one passes nothing. This is because the default key is "Edit". These keys are entered in the Module Definition. We will learn how to add these manually later. |
|
ClientScript |
String |
As the name implies, this is where you would add the client-side script to be run when this item is selected. This is paired with the CmdName attribute above. We are leaving this blank for your actions. |
|
UseActionEvent |
Boolean |
This determines if the user will receive notification when a script is being executed. |
|
Secure |
SecurityAccessLevel |
This is an Enum that determines the access level for this menu item. |
|
Visible |
Boolean |
Determines whether this item will be visible. |
|
New Window |
Boolean |
Determines whether information will be presented in a new window. |
You will notice that the second parameter of the Add method asks for a title. This is the text that will show up on the menu item you create. In our code you will notice that instead of using a string, we use the Localization.GetString method to get the text from a local resource file.
Actions.Add(GetNextActionID, _
Localization.GetString( _
Entities.Modules.Actions.ModuleActionType.AddContent, _
LocalResourceFile), _
Entities.Modules.Actions.ModuleActionType.AddContent, _
"", _
"", _
EditUrl(), _
False, _
Security.SecurityAccessLevel.Edit, _
True, _
False)
Localization is one of the many things that DotNetNuke 3.0 has brought us. This allows you to set the language seen on most sections of your portal to the language of your choice. Localization is somewhat beyond the scope of this chapter, but we will at least implement it for the actions menu.
To add a localization file, we first need to create a folder to place it in. Right-click on the EganEnterprises.CoffeeShopListing project in the Solution Explorer and select Add | New Folder . Name the folder App_LocalResources . This is where we will place our localization file. To add the file, right-click on the App_LocalResources folder and select Add | Add New Item from the menu. Select Assembly Resource File from the options and name it ShopList.ascx.resx . Click on Open when you are done.

Under the name section add the resource key AddContent.Action and give it a value of Add Coffee Shop . The action menu we implemented using the IActionable interface earlier uses this key to place Add Coffee Shop on the context menu.

To learn more about how to implement localization in your DotNetNuke modules, please see the DotNetNuke Localization white paper (\DotNetNuke\Documentation\Public\DotNetNuke Localization.doc ).
Now we can move on to the other interfaces. As we stated earlier, these interfaces only need us to add the shell of the implemented functions into this file. These will only be placed in this file to allow the framework to see, using reflection, if the module implements the interfaces. We will write the code to implement these interfaces in the CoffeeShopListingController class later.
Public Function ExportModule(ByVal ModuleID As Integer) _
As String Implements _
DotNetNuke.Entities.Modules.IPortable.ExportModule
' included as a stub only so that the core
'knows this module Implements Entities.Modules.IPortable
End Function
Public Sub ImportModule(ByVal ModuleID As Integer, _
ByVal Content As String, _
ByVal Version As String, _
ByVal UserID As Integer) _
Implements DotNetNuke.Entities.Modules.IPortable.ImportModule
' included as a stub only so that the core
'knows this module Implements Entities.Modules.IPortable
End Sub
Public Function GetSearchItems( _
ByVal ModInfo As DotNetNuke.Entities.Modules.ModuleInfo) _
As DotNetNuke.Services.Search.SearchItemInfoCollection _
Implements DotNetNuke.Entities.Modules.ISearchable.GetSearchItems
' included as a stub only so that the core
'knows this module Implements Entities.Modules.IPortable
End Function
That is all the code we need at this time to set up our view module. Open up the display portion of the control in Visual Studio, and by using Table | Insert | Table on Visual Studio's main menu, add an HTML table to the form. Add the following text to the table:

We add the table and text because we will be testing our modules to make sure that everything is in order before moving on the more advanced coding. Again, setting test points in your development allows you to pinpoint errors that may have been introduced into your code. Once we finish the setup for the Edit and Settings controls we will test the module to make sure we have not missed anything.
Module Edit Control
The Edit control is used by administrators to modify or change how your module functions. To set up the Edit control follow the steps we took to create the View control with the following exceptions:
· Do not
implement the IPortable
, IActionable
, and ISearchable
interfaces.
The context menu only works with the View control.
The control menu is used to navigate to the
Edit control.
· Change the text in the table to say EditShopList
RowOne
and
EditShopList
RowTwo
.
· Save the file as EditShopList.ascx .
Add the following in the HTML section:
<%@ Control language="vb" AutoEventWireup="false"
Inherits="EganEnterprises.CoffeeShopListing.EditShopList"
CodeBehind="EditShopList.ascx.vb"%>
and this to the code-behind page:
Imports DotNetNuke
Namespace EganEnterprises.CoffeeShopListing
Public MustInherit Class EditShopList
Inherits Entities.Modules.PortalModuleBase
Private Sub Page_Load(ByVal sender As System.Object, _
ByVal e As System.EventArgs) Handles MyBase.Load
'Put user code to initialize the page here
End Sub
End Class
End Namespace
Again, add an HTML table to your control. When viewing your control in design mode it should look like the figure below.
![]()
Module Settings Control
The DotNetNuke framework allows you to add customized settings to the Module Settings Page. To do this you need to implement a Settings control.
To set up the Settings control follow the steps we took to create the View control with the following exceptions.
· Do not
implement the IPortable
, IActionable
, and
ISearchable
interfaces.
· Change the text in the table to say OptionModule
RowOne
and
OptionModule
RowTwo
.
· Save the file as Settings.ascx .
Add the following to the HTML section:
<%@ Control language="vb" AutoEventWireup="false" Inherits="EganEnterprises.CoffeeShopListing.Settings" CodeBehind="Settings.ascx.vb"%>
In the code-behind
section it gets a little tricky. As opposed to the other two controls,
this control inherits from ModuleSettingsBase
instead of PortalModuleBase
. This causes a problem in the Visual Studio designer
when you attempt to view your form in design mode. The Visual Studio designer
will show the following error.
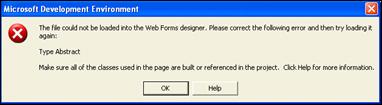
This is because the ModuleSettingsBase has two abstract methods that we will need to implement: LoadSettings and UpdateSettings . So unless you want to design your control using only HTML, you will need to use the following workaround.
When you need to see
this control in the designer, just comment out the Inherits
ModuleSettingsBase
declaration and both the public overrides
methods (LoadSettings
and UpdateSettings)
, and instead inherit from the PortalModuleBase
. You can then
drag and drop all the controls you would like to use from the toolbox and
adjust them on your form. When you are happy with how it looks in the designer,
simply switch over the Inherits
statements. For now, the only code we need in the code-behind
file for this control is the one below. We will add to this code once we have
created the DAL (Data Access Layer)
Imports DotNetNuke
Namespace EganEnterprises.CoffeeShopListing
Public Class Settings
Inherits Entities.Modules.ModuleSettingsBase
'Inherits Entities.Modules.PortalModuleBase
Private Sub Page_Load(ByVal sender As System.Object, _
ByVal e As System.EventArgs) Handles MyBase.Load
'Put user code to initialize the page here
End Sub
Public Overrides Sub LoadSettings()
End Sub
Public Overrides Sub UpdateSettings()
End Sub
End Class
End Namespace
Just like the other controls, add an HTML table to the control so we can test our modules to this point.
![]()
With all your controls complete, build your project and verify that it builds successfully. At this point, the module still cannot be viewed in a browser within the DotNetNuke framework. To do this you will first need to add module definitions to the portal.
Adding Module Definitions
When you upload a free or purchased module to your portal by using the host's file manager, the module definitions are added for you automatically. When developing modules, you will want to be able to debug them in the DotNetNuke environment using Visual Studio. This requires you to add module definitions manually.
Adding module
definitions makes the module appear in the control panel module dropdown when
you are signed on as host or admin. It connects your controls to the portal
framework.
To add the module definitions needed for our project:
1. Hit F5 to run the DotNetNuke solution, log in as host, and click on the Module Definitions option on the Host menu.
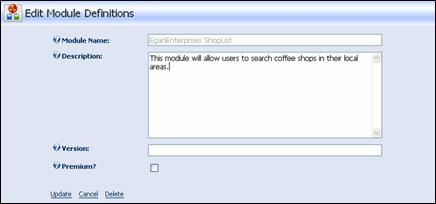
2. Under the Module Definition menu, select Add New Module Definition :
3. Enter the name for your module and a short description of what it does. When you are finished, click on the Update link:
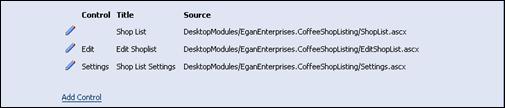
4. This will bring up a new section that allows you to add the definitions for the module. Enter the New Definition name and click on Add Definition . This will add the definition to the Definitions dropdown and will bring up a third section that will allow you to add the controls created in the previous section:

First, we will add the View control for the module.
1. Click on the Add Control link to start.
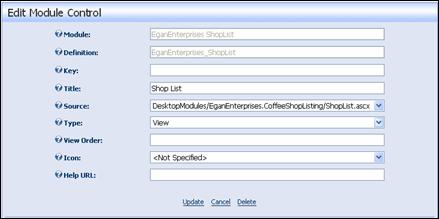
2. Enter the Title for the control. This is the default title when the control is added to a tab.
3. Select the Source for the control from the drop-down list. You will be selecting the file name of our control. This is the View control we created in the last section. Select the control from the dropdown.
4. Select the Type of control. This is the control that non-administrators will see when they view your module on the portal. Select View from the dropdown.
5. Click Update when done.
Next we want to add our Edit control.
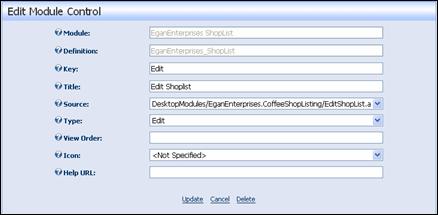
1. Enter Edit for the Key field. This is the key that the Actions Menu we created earlier will use to navigate to this control.
2. Enter a Title for the control.
3. Select the ShopListEdit.ascx control from the Source drop-down list.
4. Select Edit as in the Type dropdown.
5. Click Update when complete.
Finally we need to add our Settings control.
1. Click on Add Control to add the third control for this module.
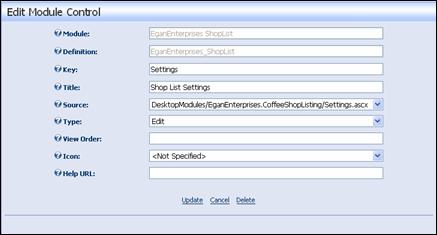
2. Enter Settings for the key field.
3. Enter a Title for the control.
4. Select the Settings.ascx control from the Source drop-down list.
5. Select Edit as in the Type dropdown.
6. Click Update when complete.
This will complete the module definition. Your control page will look like the following.
Click on the Home page menu item to exit the module definition section.
Adding Your Module to a Page
The last step before adding the real functionality to our module is to add the module to a page. I prefer to add a Testing Tab to the portal to test out my new modules. We add the modules to the site before adding any functionality to them to verify that we have set them up correctly. We'll do this in stages so that you can easily determine any errors you encountered, by ensuring each stage of development was completed successfully.
Create a tab called Testing Tab and select EganEnterprises ShopList (or the name you used) from the Module drop-down list on the control panel and click on the Add link to add it to a pane on the page.
If all goes well you should see the module we created on the page. Verify that you can access the custom menu items from the context menu. When selected, they should bring you to the Edit and Settings controls that we created earlier.
For your Module Settings section to appear correctly in the module settings page, make sure that you have it inheriting from ModuleSettingsBase , and not PortalModuleBase .
We now have a basic template for creating our module. Before we can give our controls the functionality they need we need to construct our data layers.
This brings us to the end of this extract from Beginning Websites with VB.NET and DotNetNuke 3.0.


 Subscribe
 Twitter
 Search
 About
About
 Learn C#