
Debugging with ASP.Net
Debugging an application in a traditional ASP application has always been somewhat difficult. Although you could step through all the source code with a debugger, there was no way to see results in real time (enable tracing) without the strategic placement of ‘Response.Write’ commands throughout your code, and cluttering your output with the Response.Write results. Unfortunately, you had to go back and remove all these statements before releasing the application into production. There was no easy way to implement a switch and turn tracing on and off. ASP.Net has changed this process by giving us an elegant alternative to the ‘Response.Write’ solution traditional ASP programmers use. With .NET, you do have a switch which can turn tracing on and off. There are two levels of trace information in ASP.NET: page-level and application-level.
Page Level Tracing
The “switch” for page level tracing is found in the @ Page directive of each ASPX file. Tracing is disabled by default. Turning on tracing for a page results in a stream of neatly formatted information appended to the end of the page. The information includes:
- Request details (time, type, status code)
- Size (in bytes) required to render the page, and each control.
- Timing information for critical points of the page’s lifecycle
- Cookie information sent to the server
- Client HTTP headers
- Form data
- Session and application state associated with the request
- Query strings sent with the request
- All server variables (REMOTE_HOST, SERVER_NAME, etc).

To produce these tracing results, a new @ Page directive for the form is shown below.
<%@
    Page language="c#"
    Codebehind="WebForm1.aspx.cs" AutoEventWireup="false"
    Inherits="EmployeeForm.WebForm1"
    Trace="true"
    TraceMode = "SortByTime"
%>
TraceMode is an optional parameter. The SortByTime value instructs the runtime to sort trace messages based on the time they arrived, while SortByCategory sorts the messages by the category name. ASP.NET provides default trace messages with a category of aspx.page. You can instrument your own code using the Trace property of the Page object. The Trace property is an instance of the TraceContext class, whose member methods Write and Warn place time-stamped custom trace information into the trace log. Using Warn will cause the trace log entry to appear in red instead of black. Also, if you want to avoid expensive calculations in producing trace messages when tracing is not in effect, check the IsEnabled property on the Trace object. In our employee report web form, we could add the following statements to the Page_Load method.
private void Page_Load(object sender, System.EventArgs e)
{
if(!IsPostBack)
{
Trace.Write("SQL", "Starting SQL code");
SqlConnection sqlConnection = new SqlConnection(connectString);
sqlConnection.Open();
SqlCommand sqlCommand = new SqlCommand();sqlCommand.CommandText =
"SELECT pub_id AS ID, pub_name AS Name, " +
"city AS City, state AS State, " +
"country AS Country " +
"FROM publishers";sqlCommand.Connection = sqlConnection;
SqlDataReader reader = sqlCommand.ExecuteReader();
Trace.Write("SQL", "Ending SQL code");try
{
throw new ApplicationException("This exception is intentional");
}
catch(Exception ex)
{
Trace.Warn("Exception!", "Caught exception :", ex);
}
Trace.Write("Begin data binding");
DataGrid1.DataSource = reader;
DataGrid1.DataBind();
Trace.Write("End data binding");
}
}
Each trace method offers three overloaded versions. The simplest call passes just a trace message as an argument, while the most detailed call allows you to pass a category string, a message, and an exception to dump into the trace log. The most common usage is to pass just a category name and a message. The above code produces the following output.
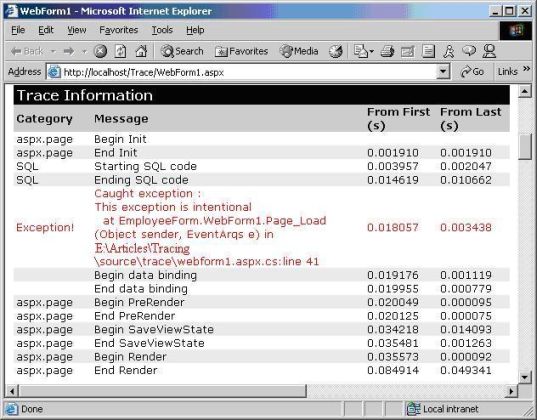
Application-Level Tracing
To enable tracing for an entire application we need to modify the trace section of the web.config file. Not only does this allow the runtime to log trace messages from every page in the application, it also enables a trace viewer (trace.axd) in the application’s root directory. The trace viewer output for our example application is shown below.
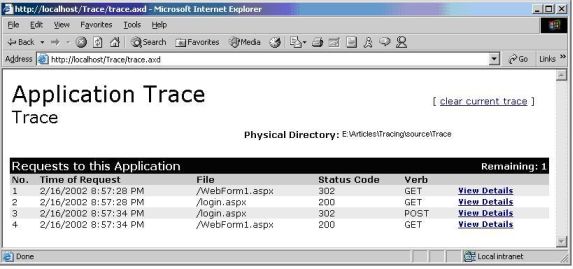
From the trace.axd view you can drill down into the individual trace logs for each request. The number of trace logs kept for viewing, and other parameters, are controlled by the attributes in the web.config file. The trace section for this application is shown below.
<traceThe enabled attribute turns tracing on and off, while requestLimit controls the maximum number of trace requests to store on the server. Once the number of traces reach this limit, no new traces are stored, but clicking on the clear current trace hyperlink in the upper right will clear the current traces and allow the server to store new traces. When the pageOutput attribute is true, the trace messages are also appended to the end of the page output, like we saw earlier. Setting pageOutput to false allows you to see the trace messages for a request only from trace.axd, the messages are not appended to the output of the pages. However, an @ Page directive can override this behavior by explicitly enabling tracing for a page. The traceMode attribute has the same values and behavior as we saw in the @ Page example. Finally, the localOnly attribute, when true, restricts viewing of the trace.axd output to the local machine, a good security measure
enabled="true"
requestLimit="5"
pageOutput="false"
traceMode="SortByTime"
localOnly="true"
/>


 Subscribe
 Twitter
 Search
 About
About
 Learn C#