
 If you enjoyed this article, you'll enjoy the book even more! Order now from Packt Publishing and save 10%!
…thoughts arrive like butterflies – Gossard / Vedder
Windows Workflow might be the most significant piece of middleware to arrive on the Windows platform since COM+ and the Distributed Transaction Coordinator. The difference is, not every application needs a distributed transaction, but nearly every application does have a workflow encoded inside. To understand the types of problems Windows Workflow is designed to solve, let’s talk about workflow in a generic sense.
What is a workflow? A simple definition would say a workflow is the series of steps, decisions, and rules needed to complete a specific task. Think of the workflow that takes place when you order food at the local pizza shop. You tell the cashier the type of pizza you want. The cashier passes this information to the cook, who gathers ingredients and puts a pie in the oven. The cook hands a finished pizza to the cashier, who collects payment and completes the workflow by handing over your pizza. The work flows, to the cashier, then to the cook, and then back again.
During each of these steps, all parties are also evaluating rules and making decisions. Before accepting the order, the cook has to compare the order against the ingredients in stock. The cashier has to validate and process any coupons you might present, and notify the manager if you pay with a counterfeit looking bill.
Not every workflow has to involve humans (which is good, because humans complicate even the simplest process). A workflow can take place between two distributed software applications. For example, two content management applications might need to follow a specific set of steps and rules when synchronizing content in the middle of the night.
Most workflows are stateful, and run for a relatively long time. Hopefully, your pizza will be ready within 30 minutes. During those 30 minutes, state information about your order, like the toppings you selected, has to be available. A different workflow happens when the pizza shop orders cheese. The cheese supplier might not deliver the mozzarella for 30 hours, and the pizza shop may not pay the cheese supplier for 30 days. During those 30 days, something needs to maintain the state of the workflow for a purchase.
A workflow may spend a large portion of it’s lifetime waiting for events to happen in the world around it. A workflow may be idle when waiting for a delivery, or waiting for a payment, or waiting for a pizza to finish in the oven. During these wait times, the workflow is idle and no resources are required by the workflow.
A workflow then is a series of steps to finish a task. A workflow is often long-running and stateful, and often needs to wait on events and interact with humans. You can see workflows everywhere you look in the world. As software developers, we often have to codify the workflows around us into software applications.
Building Workflow Solutions
We’ve all been at the table with domain experts and business analysts. Invariably the word workflow will arise as we talk about the software they need. While the workflow they describe might sound simple, we know the devil is always in the details. We’ll need database tables and data access classes to manage the workflow state. We’ll need components to send emails and components to wait for documents to arrive in a queue. We will also need to express the workflow itself for the computer to execute. Let’s look at a theoretical implementation of a workflow.
// new purchase order
class PurchaseOrderWorkflow
{
public void Execute(PurchaseOrder order)
{
WaitForManagerApproval(order);
NotifyPurchaseManager(order);
WaitForGoods(order);
}
}
Assuming we have definitions for the three methods inside of Execute, can workflow really look this simple? The answer is no. We’ll have to add code for exception handling, logging, and diagnostics. We’ll need to raise events and provide hooks to track and cancel a running workflow. Also, this workflow will be idle and waiting for an external event to occur, like the arrival of the purchased goods, for a majority of the time. We can’t expect to block a running application thread for days or weeks while waiting for a delivery. We’ll need to provide a mechanism to save the workflow’s state of execution to a database and remove the running workflow instance from memory, only to restore state at a later date when a significant event occurs.
Unfortunately, we will have so much code in and around the workflow that we will lose sight of the workflow itself. All the supporting code will hide the process we are trying to model. A non-technical businessperson will never be able to look at the code and see the workflow. A developer will need to dig through the code to find the workflow inside.
Consequently, most workflow solutions separate the definitions of workflow from the engine used to execute the workflows. This approach allows a developer, or even a businessperson, to express what the workflow should be, while the workflow engine takes care of how to execute the workflow. These days, many workflow solutions define workflows inside the loving embrace of angled brackets. Let’s look at some theoretical XML for a workflow definition.
<Steps>
<WaitTask Event="ManagerApproval"/>
<NotifyTask Target="PurchaseManager"/>
<WaitTask Event="Delivery"/>
</Steps>
<Parameters>
<Parameter Type="PurchaseOrder" Name="order"/>
</Parameters>
</Workflow>
Let’s ask the question again – can workflow really look this simple? The answer is yes – what we will need is a workflow engine that understands the XML, and can transform the XML into instructions for the computer. The engine will include all the required features, like exception handling, tracking, and enabling cancellations.
The C# code we saw earlier is an example of imperative programming. With imperative programming, we describe how to perform a task by providing a series of instructions to execute. The XML markup above is an example of declarative programming. With declarative programming, we describe what the task looks like, and let other software determine the steps required to complete the task. Most of the commercial workflow solutions on the market allow a declarative definition of workflow, because the declarative approach doesn’t become cluttered with exception handling, event raising, and other lower level details.
One of the benefits to using XML is the large number of tools with the ability to read, modify, create, and transform XML. XML is tool-able. Compared to parsing C# code, it would be relatively easy to parse the XML and generate a visualization of the workflow using blocks and arrows. Conversely, we could let a business user connect blocks together in a visual designer, and generate XML from a diagram.
Now we have some idea of what we desire in a workflow solution. We want to specify workflows in a declarative manner, perhaps with the aid of a visual designer. We want to feed workflow definitions into a workflow engine. The engine will manage errors, events, tracking, activation and de-activation.
Enter Windows Workflow Foundation.
A Windows Workflow Tour
Microsoft’s Windows Workflow Foundation is one piece of the next-generation API by the name of WinFX. WinFX builds atop the .NET common language runtime to provide a managed API for presentation (Windows Presentation Foundation, or WPF), communications and web services (Windows Communication Foundation, or WCF), and workflow. Microsoft will support Windows Workflow (WF) on Windows XP, Windows Server 2003, and Windows Vista.
Support from current and future Microsoft platforms means WF could reach near ubiquity over time. We can use WF in smart client applications, and in simple console mode programs. We can also use WF in server-side applications, including Windows services, and ASP.NET web applications and web services. All an application needs to do is host the WF runtime. WF will make an appearance in several of Microsoft’s own products, including SharePoint Services and Biztalk Server. We will now look at an overview of the essential features of Windows Workflow.
Workflow Activities
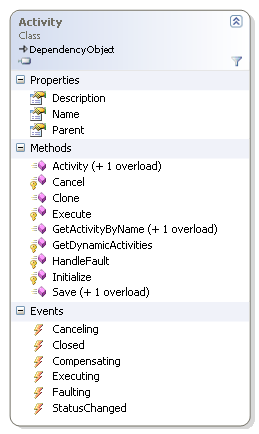
The primary building block in Windows Workflow is the activity. All activities in WF derive from an Activity base class. Activities compose the steps, or tasks in a workflow, and define the workflow. We can arrange activities into a hierarchy and feed the activities to the workflow engine as instructions to execute. The activities can direct workflows involving both software and humans.
The Activity class defines operations common to all activities in a workflow, like Execute and Cancel. The class also defines common properties, like Name and Parent, as well as common events like Executing and Closed (the Closed event fires when an Activity is finished executing).
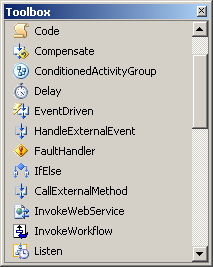
WF ships with a set of 24 ready-made activities in the base activity library. The primitive activities in the library provide a foundation to build upon, and include control flow operations, like the IfElseActivity and the WhileActivity. The base activity library also includes activities to wait for events, to invoke web services, to execute a rules engine, and more.
Custom Activities
Microsoft expects developers will create custom activities to solve problems specific to their domain. For instance, pizza delivery workflows could benefit from custom activities like SendOrderToKitchen or NotifyCustomer.
All custom activities will also ultimately derive from the base Activity class. The workflow engine makes no special distinction between activities written by Microsoft and custom activities written by third parties.
We can use custom activities to create domain specific languages for building workflow solutions. A domain specific language can greatly simplify a problem space. For instance, a SendOrderToKitchen custom activity could encapsulate a web service call and other processing logic inside. The Activity is obviously specific to the restaurant problem domain. A developer will be more productive working with this higher-level abstraction than she would be with the primitive activities in the base activity library. Even a restaurant manager will understand SendOrderToKitchen and might be able to arrange the activity in a visual workflow designer. It will be difficult to find a restaurant manger who feels comfortable arranging WhileActivity and InvokeWebServiceActivity objects in a workflow designer.
C#, VB.NET, and XML are general-purpose languages and have the ability to solve a wide array of different problems. We can use C# to develop solutions for pizza restaurants as well as hospitals, and the language works equally well in either domain. A domain specific language excels at solving problems in a particular area. A domain specific language for restaurant workflow would boost productivity when writing software for a restaurant, but would not be as effective when writing software for a hospital.
Windows Workflow and XAML
There are a number of techniques available for defining a workflow. We can use code, we can use a designer, and we can use eXtensible Application Markup Language (XAML, pronounced zammel). XAML files are valid XML files, and developers can define workflows using any text or XML editor. The WF visual designer also reads and writes XAML. Here is a simple workflow specified with XAML.
x:Class="chapter1_bugflow.Workflow1"
x:Name="Workflow1"
xmlns:x="http://schemas.microsoft.com/winfx/2006/xaml"
xmlns="http://schemas.microsoft.com/winfx/2006/xaml/workflow">
<WhileActivity x:Name="whileActivity1">
<WhileActivity.Condition>
<RuleConditionReference ConditionName="Condition1" />
</WhileActivity.Condition>
<CodeActivity x:Name="codeActivity1" ExecuteCode="codeActivity1_ExecuteCode" />
</WhileActivity>
</SequentialWorkflowActivity>
XAML brings a declarative programming model to Windows Workflow. Our workflow is trivial and contains only a single activity inside – a CodeActivity. When the workflow engine executes the CodeActivity, the CodeActivity will invoke a method specified by the ExecuteCode attribute.
XAML is not a technology specific to Windows Workflow. As an “extensible application” markup language, XAML is also present in Microsoft’s presentation framework, WPF. In WPF, XAML declaratively constructs a rich user interface consisting of not only buttons and labels, but also animation storyboards and data templates.
One important capability of declarative XAML is the ability to join forces with imperative code in a partial class. Partial classes are a new feature in .NET 2.0 available to both VB.NET and C# developers. Partial classes allow the definition of a class to span more than one file. The XAML above will transform into a partial class by the name of HelloWorldWorkflow. We control the name of the class from XAML with x:Name attribute in the root node. We can add members to the generated class by defining a class with the same name and with the partial keyword.
{
private void codeActivity1_ExecuteCode_1(object sender, EventArgs e)
{
// ...
}
}
In this example, we’ll be adding the codeActivity1_ExecuteCode_1 method as a member of the same class produced by the XAML.
Visual Studio 2005 Extensions
The Windows Workflow SDK includes a set of extensions for Visual Studio. The extensions provide a number of features, including a visual designer for constructing workflows.

Three tabs at the bottom of the designer switch between views of a workflow. To the far left is the SequentialWorkflow view, which is active in the screenshot and displaying the same workflow we saw in XAML form earlier. There is only a single activity inside to execute. The middle, unselected tab displays the cancel handler view. The cancel view will display activities to execute for a cancelled workflow. Finally, the third view is the fault handler view . The fault handler will contain activities to execute when the workflow experiences an unhandled exception.
The designer uses the same windows we’ve come to love as Windows and web form developers. The Toolbox window will list the activities available to drag onto the design surface. We can add our own custom activities to the toolbox. Once an activity is on the design surface, the Properties window will list the activities properties to configure and the events we can handle.
Validation & Debugging
One of the designer’s jobs is to provide validation feedback for the activities in a workflow. Each activity can define it’s own design-time and run-time validation. The designer will flag an activity with a red exclamation point if the activity raises validation errors. For example, a CodeActivity will display a red exclamation point until we set the ExecuteCode property. Without a method to invoke, the CodeActivity is useless, but the validation catches this problem early and provides visual feedback.
The designer and Visual Studio extensions also provide debugging features. We can set breakpoints on an activity in the workflow designer. When execution stops, we can look at the Call Stack window to see the activities previously executed in the workflow instance. The debugger commands Step In, Step Out, and Step Over all work intuitively, for instance, the Step In command will move to the first activity inside of a composite activity, while step over executes the entire composite activity and move to the next sibling.
Designer Looks
The workflow designer allows customization of the design surface via themes. A theme defines the background colors, fonts, grid lines, and border styles to use on the design surface. We can even specify color and border styles for specific activity types. Through Visual Studio, we can create new themes, or modify existing themes.
All this styling ability isn’t just to make the designer look pretty in Visual Studio, however. The WF designer is a component we can host inside our own applications. The ability to host the designer opens a number of interesting possibilities. First, we can host the designer and allow the non-developer types (a.k.a. business people) to design and edit workflows. By providing custom activities, we can match the vocabulary needed to build a workflow with a vocabulary the business people will understand (a domain specific language). By providing custom themes, we can match the designer look with the look of our application.
The Windows Workflow Runtime
One perspective for Window Workflow is to view the workflow activities as instructions, or opcodes, for a workflow processor to execute. In Windows Workflow, the processor is in the WF runtime. The runtime requires a host to start the workflow party.
Hosting the Windows Workflow Runtime
Windows Workflow is not a stand-alone application. Like ASP.NET, WF lives inside a handful of assemblies (most notably for this topic, the System.Workflow.Runtime.dll assembly). Like the ASP.NET runtime, WF needs a host process to load, initialize, and start its runtime before anything interesting can happen. Unlike the traditional server side usage of ASP.NET, however, WF will be useful in a variety of different hosts. We can host WF in a smart client application, a console application, or a Windows service, for instance.
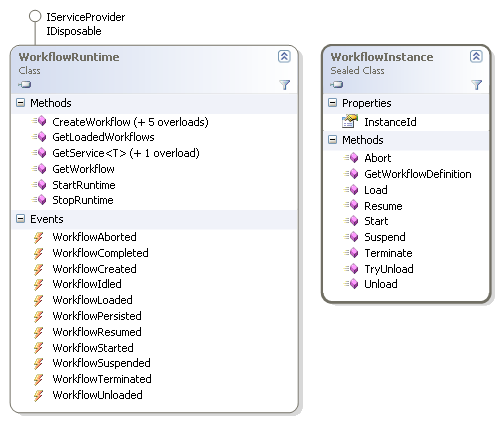
Creating an instance of the WorkflowRuntime class and calling StartRuntimeis all we need to spin up the workflow execution environment. WorkflowRuntime defines methods that allow customization of the execution environment. The class also defines events we can listen for during execution. The runtime will fire an event when workflows finish execution, abort, turn idle, and more.
Once we’ve created an instance of the runtime, we can create workflows with the CreateWorkflow method. The method provides overloads for creating workflows from compiled workflow types, or by passing an XmlReader with the XAML definition of a workflow. The CreateWorkflow method returns an object of type WorkflowInstance. The WorkflowInstance class represents an individual workflow. The Start method will begin the execution of a workflow. If an exception occurs the workflow will invoke the Terminate method (which in leads to the runtime raising a WorkflowTerminated event).
The WorkflowRuntime and WorkflowInstance classes are arguably the most important classes needed at runtime, but they are not the only classes available. Other classes inside the WF assemblies provide important services to the workflow runtime.
Runtime Services
The WorkflowRuntime class provides only the basic features for executing workflows. Earlier, we mentioned important features we’d like to see in a workflow engine, like the ability to track active workflows and deactivate idle workflows. Don’t worry, these features are available through an extensibility mechanism of WorkflowRuntime – the AddService method. AddService allows us to make one or more services available to the runtime. These services might be custom services we’ve written specifically for our domain, like a custom scheduling service, or they might be services already written by Microsoft and included with WF. Let’s continue our tour by looking at some of the important services already available.
Scheduling Services
A scheduling service controls threads the runtime needs to execute workflows. The DefaultWorkflowSchedulerService creates new threads to execute workflows. Because the threads are separate from the host application, the workflows do not block any application threads and execute asynchronously. The maximum number of simultaneously executing workflows is configurable.
A second scheduling service, the ManualWorkflowSchedulerService, is available when the host application is willing to donate threads to the workflow runtime. Donating a thread to the runtime is a useful technique in server side applications, like ASP.NET web applications and web services. Server-side applications typically pull a thread from a pool to service each client request. It makes sense to loan the thread to the WF runtime, and let the runtime execute the workflow synchronously on the existing request thread instead of using two threads per request, which could reduce scalability.
As with all services in Windows Workflow, you can define your own scheduling service if the build in services do not fit your requirements.
Transaction Services
A transaction service, as the name might imply, allows the runtime to keep the internal state of a workflow consistent with the state in a durable store, like a relational database. The default transactional service is an instance of the DefaultWorkflowTransactionService class. Activities inside a running instance of a workflow, and the services operating on the same instance, can all share the same transaction context.
WF relies on the implementation of transactions in .NET 2.0’s System.Transactions namespace. The Transaction class in 2.0 offers a lightweight, auto-enlisting, and promotable transaction. The transaction can start as a local transaction, and later the runtime can promote the transaction to a heavyweight, distributed transaction if needed.
Persistence Services
A persistence service is responsible for saving the state of a workflow to a durable store. The SqlWorkflowPersistenceService saves the state of a workflow into a SQL Server database. Persistence is almost required for long running workflows, because we can’t have an invoice processing workflow in memory for 30 days till the customer’s payment arrives. Instead, the runtime can persist the state of the workflow and unload the instance from memory. In 30 days (or hopefully less, for the sake of our bank account), the runtime can reload the workflow instance and resume processing. The WF runtime will automatically persist a workflow that is idle or suspended.
The SqlWorkflowPersistenceService will work with SQL Server 2000 or any later version, including the free MSDE and Express versions of SQL Server. Of course, we’ll need a database schema that the persistence service understands. The WinFX installation will drop T-SQL scripts into the %WINDIR%\WinFX\v3.0\Windows Workflow Foundation\SQL\%Language% directory, where %WINDIR% is the default Windows directory (typically C:\WINDOWS), and %Language% is the language value (EN for English).
Tracking Services
A tracking service is responsible for monitoring the execution of workflows. A tracking service will tell the runtime the type of information it wants to know about workflows using a tracking profile. Once the service establishes a profile, the service can open a tracking channel to receive events and data.
WF includes a SqlTrackingService class that stores tracking data into a SQL Server database. The service will use the previously discussed transactional service to ensure the tracking data for a workflow is consistent with the state of the workflow it’s tracking. The runtime does not start a tracking service by default, but we can programmatically add a tracking service (or configure a tracking service with an application configuration file) for the runtime to use. We can retrieve the tracking data using T-SQL queries.
Now we’ve covered all the basic features of WF, so let’s put the software to work.
Our First Workflow
Maybe you’ve had one of those product managers who is always at your desk, asking “are you done, yet?” In this section, we will replace the annoying PM with a trivial Windows Workflow program. The sample isn’t meant to demonstrate all the capabilities of the platform, but give a general feel for creating and running a workflow with WF.
First, we’ll use Visual Studio to create a new Workflow project (File -> New Project) using the Sequential Workflow Console Application template. The template gives us a project with references to all the correct WF assemblies, an empty workflow, and a Program.cs file to drive the workflow.

The empty workflow is in Workflow1.xoml. The XOML file will contain the XAML definition of our workflow. If we click to expand the node containing Workflow1.xoml, we will find a C# code-beside file containing a partial class. As we mentioned earlier, the partial class will combine with the class generated from the XAML to produce a single type. If we add a property to the class in Workflow1.cs, we’ll be adding a property to the workflow itself.
{
private bool _isFixed;
public bool IsFixed
{
get { return _isFixed; }
set { _isFixed = value; }
}
private void codeActivity1_ExecuteCode(object sender, EventArgs e)
{
Console.WriteLine("Is the bug fixed?");
Char answer = Console.ReadKey().KeyChar;
answer = Char.ToLower(answer);
if (answer == 'y')
{
_isFixed = true;
}
else
{
Console.WriteLine();
Console.WriteLine("Get back to work!");
Console.WriteLine();
}
}
}
If we double-click the .xoml file the designer will appear. At this point we would want to open the Toolbox window if is not open (Ctrl+Alt+X). We can drag a While activity from the Toolbox and drop the activity between the start and end point of our workflow. The While Activity executes a child task until some condition is met. Our next step is to drag a Code activity from the Toolbox into the center of the While activity. At this point, our designer should resemble the following figure.
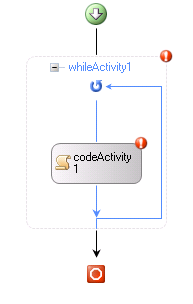
Notice both activities display a red exclamation point. The activities are failing their validation checks. We can hover the mouse over the exclamation points and open a smart tag to view the validation error. Compiling the program will create the same validation error as a compile error.
The Code activity requires us to assign an event handler for the ExecuteCode event. We can set the event by opening the Properties window (F4) and clicking the Code activity to set focus. Double-clicking in the empty space beside the ExecuteCode property will send us into the code-beside file and generate a new event handler. We can place the following code into the event handler.
{
private bool _isFixed;
public bool IsFixed
{
get { return _isFixed; }
set { _isFixed = value; }
}
private void codeActivity1_ExecuteCode(object sender, EventArgs e)
{
Console.WriteLine("Is the bug fixed?");
Char answer = Console.ReadKey().KeyChar;
answer = Char.ToLower(answer);
if (answer == 'y')
{
_isFixed = true;
}
else
{
Console.WriteLine();
Console.WriteLine("Get back to work!");
Console.WriteLine();
}
}
}
The Code activity should now pass validation, so we can turn our attention to the While activity. A While activity requires a valid Condition. Several activities in the base activity library work with conditions, including the IfElse, ConditionedActivityGroup, and Replicator activities. We can set the Condition property by opening the drop down list beside the Condition property in the Properties window. We have the choice of selecting a CodeCondition or a RuleConditionReference. These choices represent the two techniques available to express a condition, the first being with code (a method that returns a boolean value), the second being with a rule. Let’s select the RuleConditionReference. A rule condition is a named expression that evaluates to true or false, and can live in an external .rules file for easy maintenance. A plus sign appears beside the Condition property, and we can click the sign to expand the property editor.
When the Condition property expands, the Property window gives us the ability to set a ConditionName and an Expression. Clicking on the ellipses (...) button in the Condition name will launch a Select Condition dialog box.

Clicking the New Condition button then launches the Rule Condition Editor.

We want the While activity to loop until the bug is fixed. Our rule is !this.IsFixed. Once we’ve entered the condition (notice the editor provides Intellisense), we can click OK. When we return to the Select Condition dialog box, we can see the editor has given our condition the name of Condition1. We should select Condition1 and press OK. The While activity now has the ConditionName and Expression properties set, and will pass validation.
Next, we open Program.cs, which contains the method the entry point for our Console application. We need to host the WF runtime and ask the runtime to execute our workflow. The item template for a workflow project provides most of the boilerplate code we need. Let’s review the code.
{
static void Main(string[] args)
{
WorkflowRuntime workflowRuntime = new WorkflowRuntime();
workflowRuntime.WorkflowCompleted +=
new EventHandler<WorkflowCompletedEventArgs>
(workflowRuntime_WorkflowCompleted);
workflowRuntime.WorkflowTerminated +=
new EventHandler<WorkflowTerminatedEventArgs>
(workflowRuntime_WorkflowTerminated);
WorkflowInstance instance;
instance = workflowRuntime.CreateWorkflow(typeof(Workflow1)
instance.Start();
waitHandle.WaitOne();
}
static void workflowRuntime_WorkflowTerminated(object sender,
WorkflowTerminatedEventArgs e)
{
Console.WriteLine(e.Exception.Message);
waitHandle.Set();
}
static void workflowRuntime_WorkflowCompleted(object sender,
WorkflowCompletedEventArgs e)
{
waitHandle.Set();
}
static AutoResetEvent waitHandle = new AutoResetEvent(false);
}
The first step is to instantiate a WorkflowRuntime instance. We wire-up event handlers to the instance so we know if a workflow terminates (because of an exception), or completes successfully. We instantiate our bug-fixing workflow using the CreateWorkflow method, passing the Type of our workflow. Since the workflow engine executes our workflow asynchronously, we need to block our thread on an AutoResetEvent object and wait for the workflow to complete (otherwise, the console mode program would exit before the workflow executes on a different thread). An AutoResetEvent object will block a thread until the object is in a signaled state, which we do with the Set event in the event handlers.
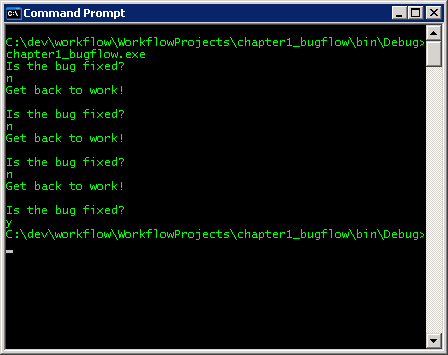
We can now build our workflow solution and run the executable from the command line.
Summary
Software developers have been implementing workflows to model business processes since the beginning of time. We know workflows are long-running and often require input from humans. An ideal paradigm for building workflows is to use a language specific to the workflow domain. A businessperson has the ability to understand the domain specific language. A workflow engine can execute the language’s instructions and provide services, like workflow persistence and transactions.
Windows Workflow brings a workflow engine and workflow development tools to Microsoft platforms. The instructions for the WF engine are activities, and we can arrange these activities using a graphical designer, XAML, code, or a combination of the three. WinWF provides the services we need for a workflow engine, including persistence, threading, and transaction services. The future looks bright for building workflow solutions.
Please bring comments and questions to my blog.


 Subscribe
 Twitter
 Search
 About
About
 Learn C#